Call Center and Call Center Pro
2600Hz’s Call Center application is a flexible cloud solution that elevates the agent experience by providing end users with an intuitive and seamless UX. The app has been built natively into Kazoo for seamless integration with all other 2600Hz apps, full API support for all features, and the reliability of Kazoo’s architecture. Call Center can be deployed either within our comm.land desktop application or in MonsterUI as a browser window.
NOTE: The most current user documentation for call center and call center pro is displayed within the actual app. This is a high level review only.
Before you get started
Here are a few key terms you’ll need to know to make the most of Call Center:
-
Queues
are the line(s) of in-bound calls that are fielded by agents and are completely customizable within the application
-
Members
are any users in your account that have been added to the Call Center app
-
Agents
are members that are in a queue and can field calls as they enter their assigned queues
-
For the queues they manage, managers
can view agent and queue performance reports, toggle agent state on agent’s behalf, assign agents to queues, eavesdrop/whisper/barge for incoming and external calls, and edit queues
-
Admins
have all the permissions of managers, but for all queues in the account; admins can also create and delete queues, set KAZOO members as Call Center Agents, create/assign skill tags to agents, toggle call recording per agent, and enable Pro features
Basic vs Pro Features
The basic features within Call Center include all the necessary functionality needed to start fielding inbound calls. Admins can create different call queues to define the customer experience when calling a specific number, including how and where the call is routed, what happens when the call is on hold, and what agents are assigned to which call extensions.
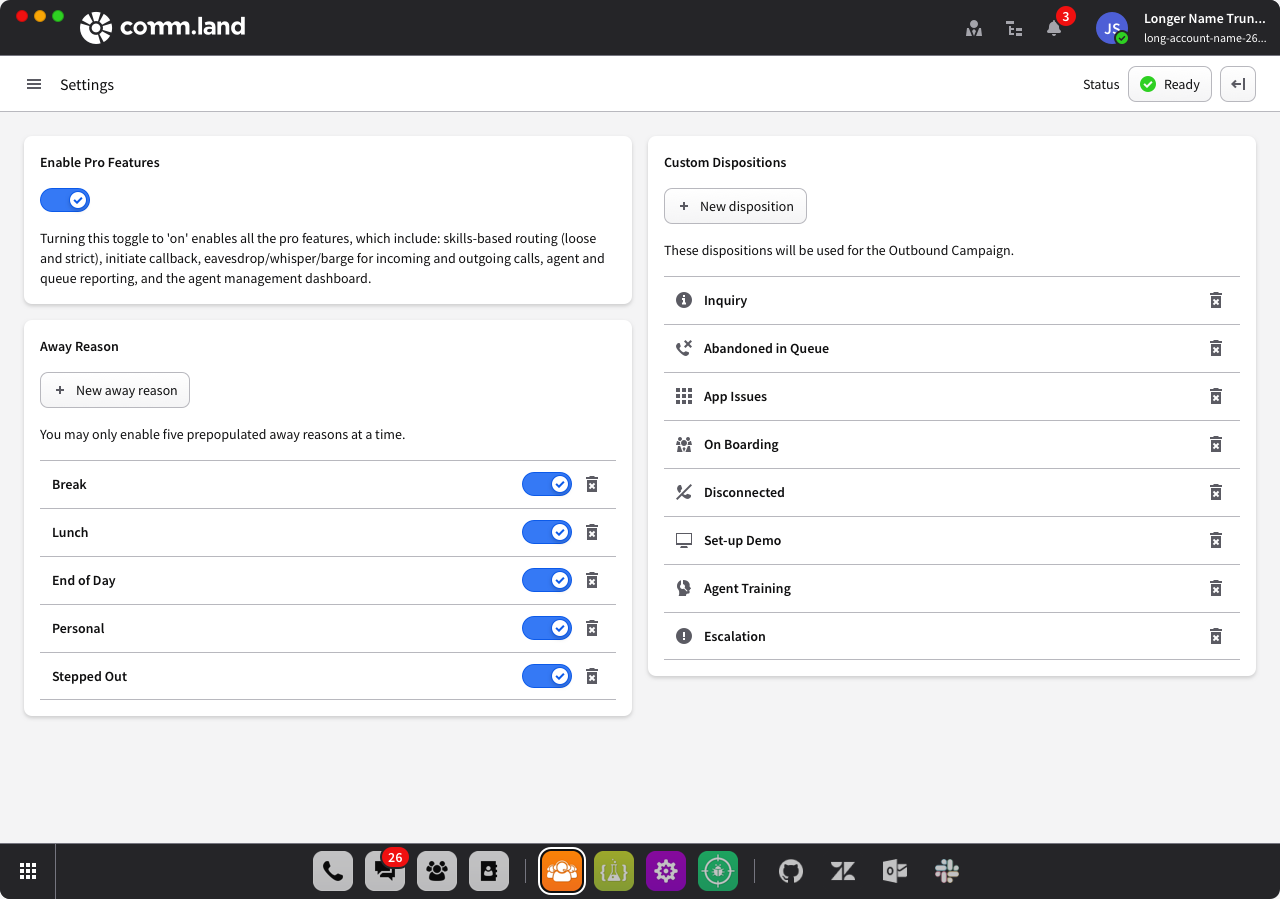
Pro features, which can be enabled by admins on the Settings page, provide more advanced call management settings and reporting features. These additional features include loose or strict skills-based routing, eavesdrop/whisper/barge, reporting on agent and queue performance, and the agent management dashboard. Please note that when enabled, the pro features will be available across the entire account.
Static UI Features
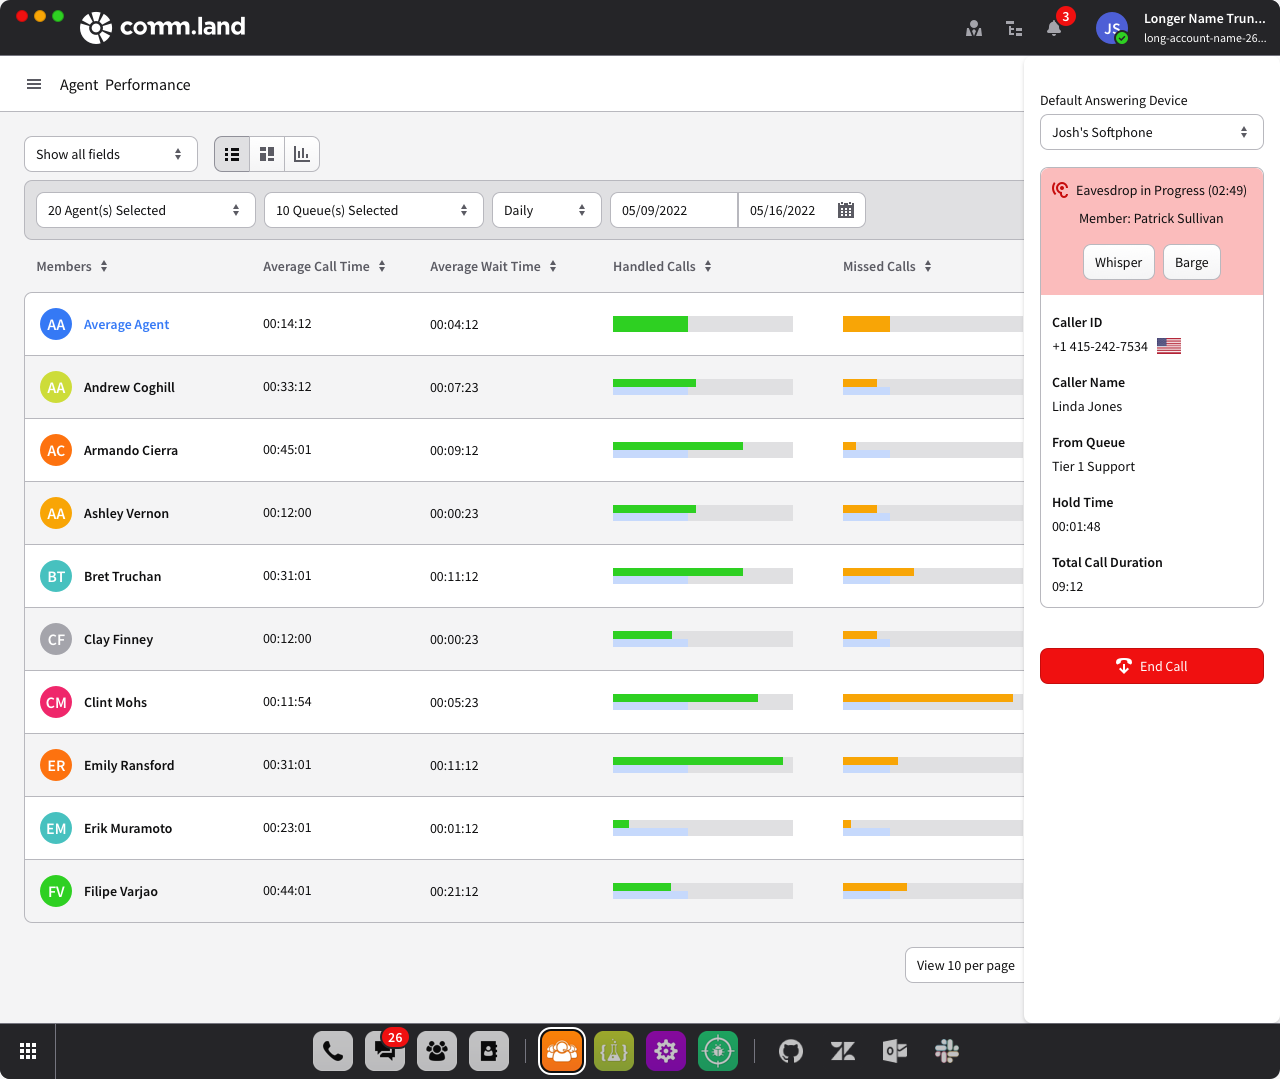
Regardless of which page a user is on, there are two static features on the UI — the user status and call drawer. The status allows a user to select an agent state from a dropdown menu of Ready, Mark as Away, or End Session.
The call drawer pops out on the right of the window and allows a user to select their default answering device from a dropdown menu. When on a call, the call drawer presents call information to the agent, including Caller ID, Caller Name, which queue the call came from, hold time, and total call duration.
Call center
Queues Page
The default view for the queues page is the queue overview, which includes queue name and status, queue performance, and agent states. This high-level view can be sorted by all, active, or paused queues and can also be searched. Note that an agent will see the queues they are assigned to, a manager will see all the queues they manage, and an admin will see all of the queues in the account.
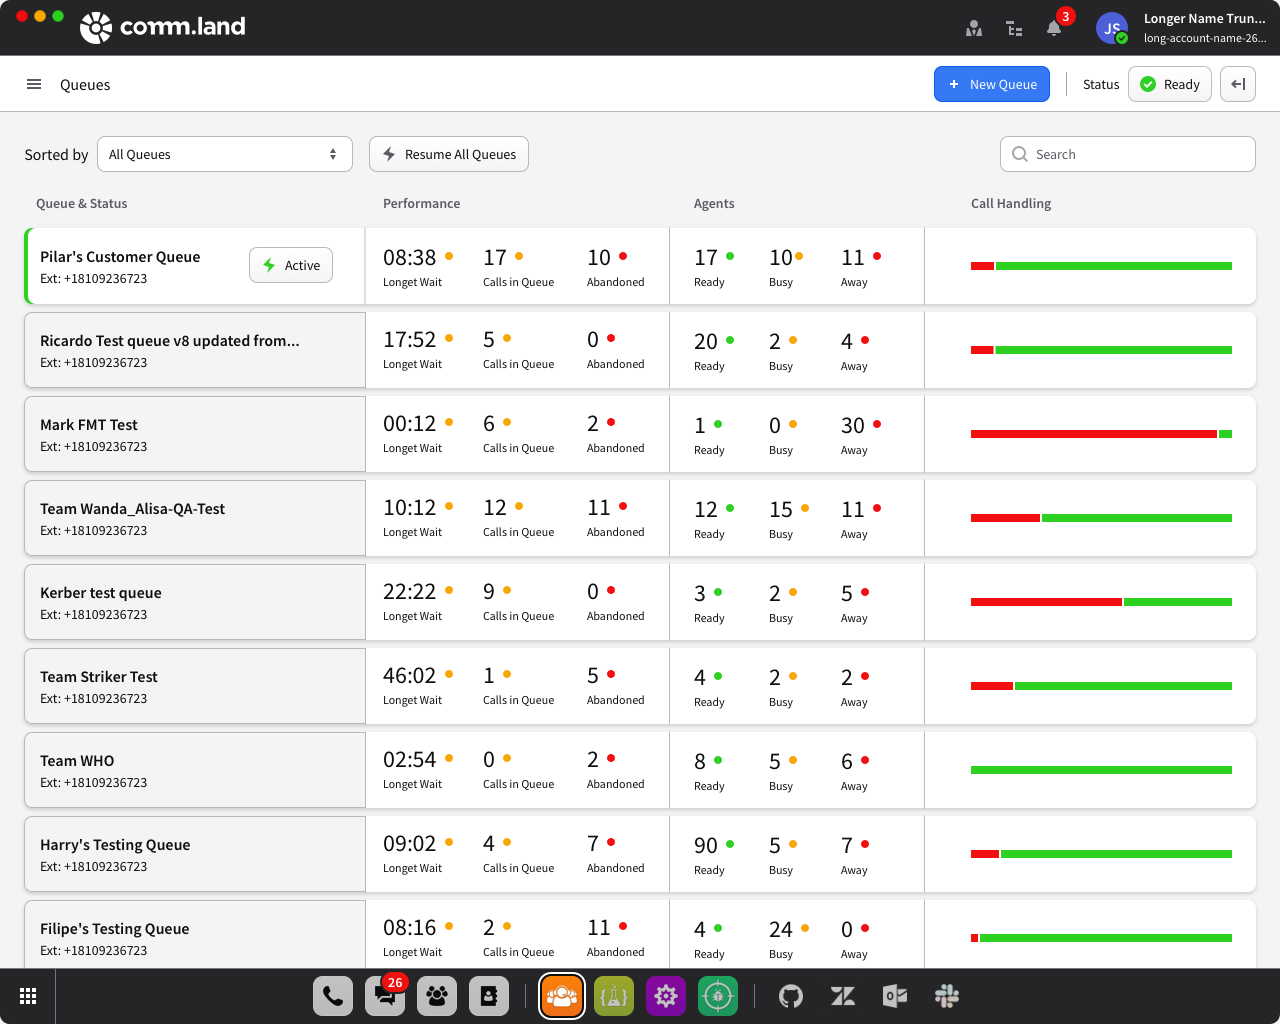
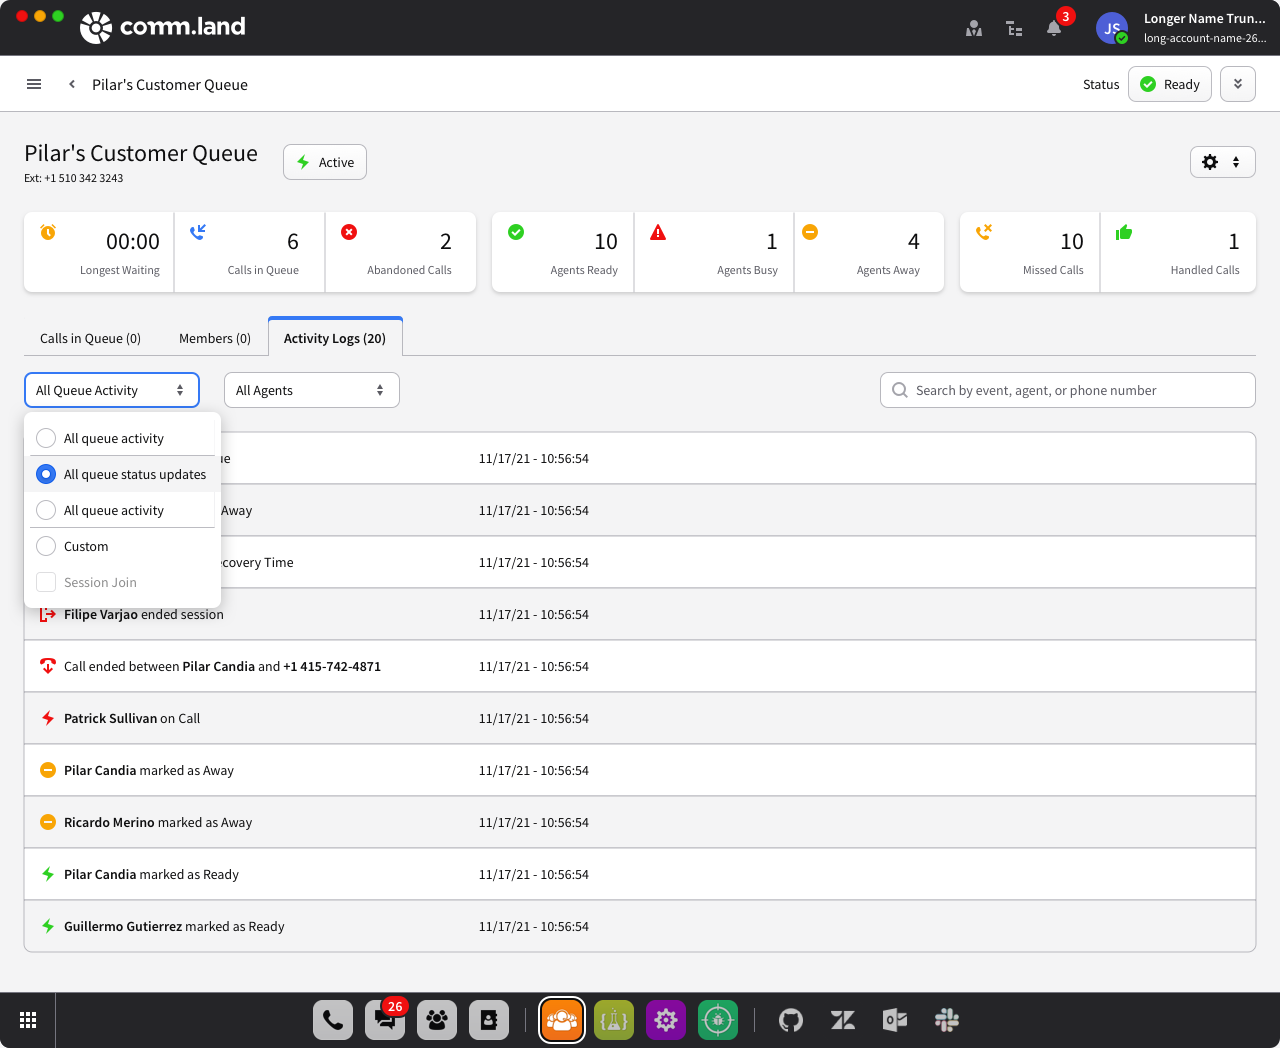
For a more in-depth view of a queue, simply click the queue from the overview list, and you will be taken to the queue details. Within this view, users are presented with all of the real-time queue information from the queue overview plus a list of all calls in the queue, a list of all agents in the queue, and an activity log for the queue.
In the Calls in Queue tab, a user can bump a call up the queue or answer it directly. The Members tab allows you to add agents to the queue, as well as see list of all agents in the queue that can be sorted according to name, role, status, call handling, session duration, time marked as away, and skills. The Activity Log represents a visual representation of everything that has happened in the queue and can be filtered by activity type and/or agent.
Create a Queue
From the overview page, admins will also see a “+ New Queue” button that will take them to the queue creation wizard that will guide the you through the 7-step process to easily create a queue.
Basic Info
First, name the new queue. Then, select a number or extension for the queue from your available numbers list. If you do not have any displayed, you can purchase one. If you want to choose an extension you will be shown choices based on your account.
General Settings
On this page, you will designate the queue’s call limit (the number of calls that can be in queue before timing out) and time out (the number of seconds a call can be in queue before timing out). You can also toggle on a handful of features for the queue, including timeout immediately if no agents are available or in ready state, record all calls in queue, or display agents to others on the Members tab of the queue details.
You will also configure an escalation callflow to determine what happens to a caller when they timeout and dropout options that allow a caller to press a digit to leave the queue. Both of these options are created from a dropdown menu of all devices, callflows, and voicemail boxes on the account.
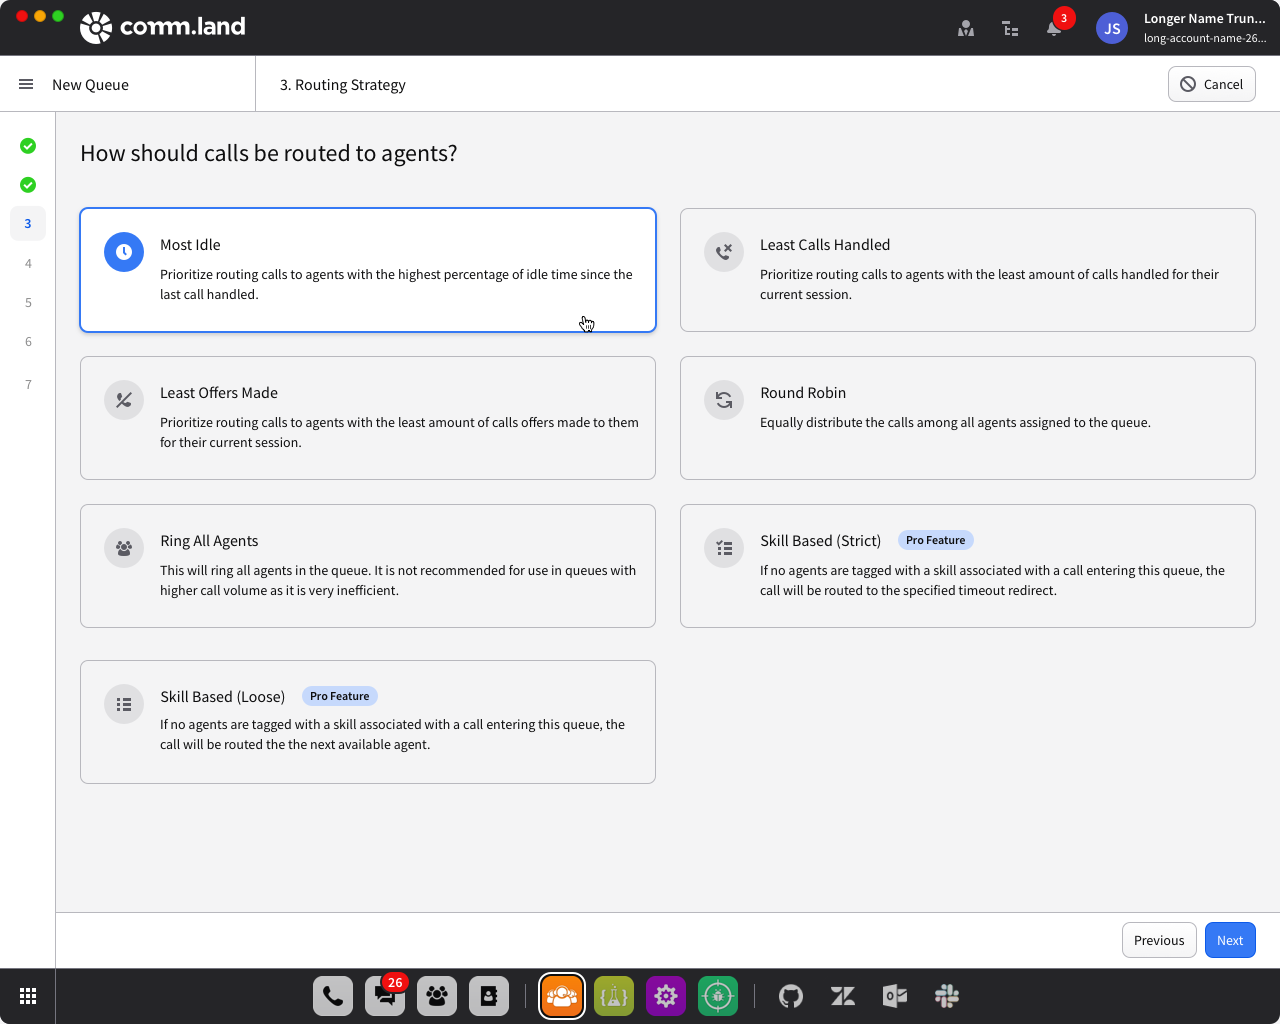
Routing Strategy
In this step you will define how calls will be routed to agents within the queue, setting priorities based on specific metrics.
- Most Idle prioritizes routing calls to agents with the highest percentage of idle time since the last call handled.
- Least Calls Handled prioritizes routing calls to agents with the least amount of calls handled for their current session.
- Least Offers Made prioritizes routing calls to agents with the least amount of call offers made during their current session.
- Round Robin will equally distribute the calls among all agents assigned to the queue.
- Ring All Agents will simultaneously route the call to all agents assigned to the queue.
- Skills-Based (Loose) will try send a call to an agent that matches the skill defined. If there are no available agents with the skill, then the call will go to the next available agent.
- Skills-Based (Strict) will send a call only to an agent that matches the skill defined. If there are no available agents with the skill, then the call will be escalated.
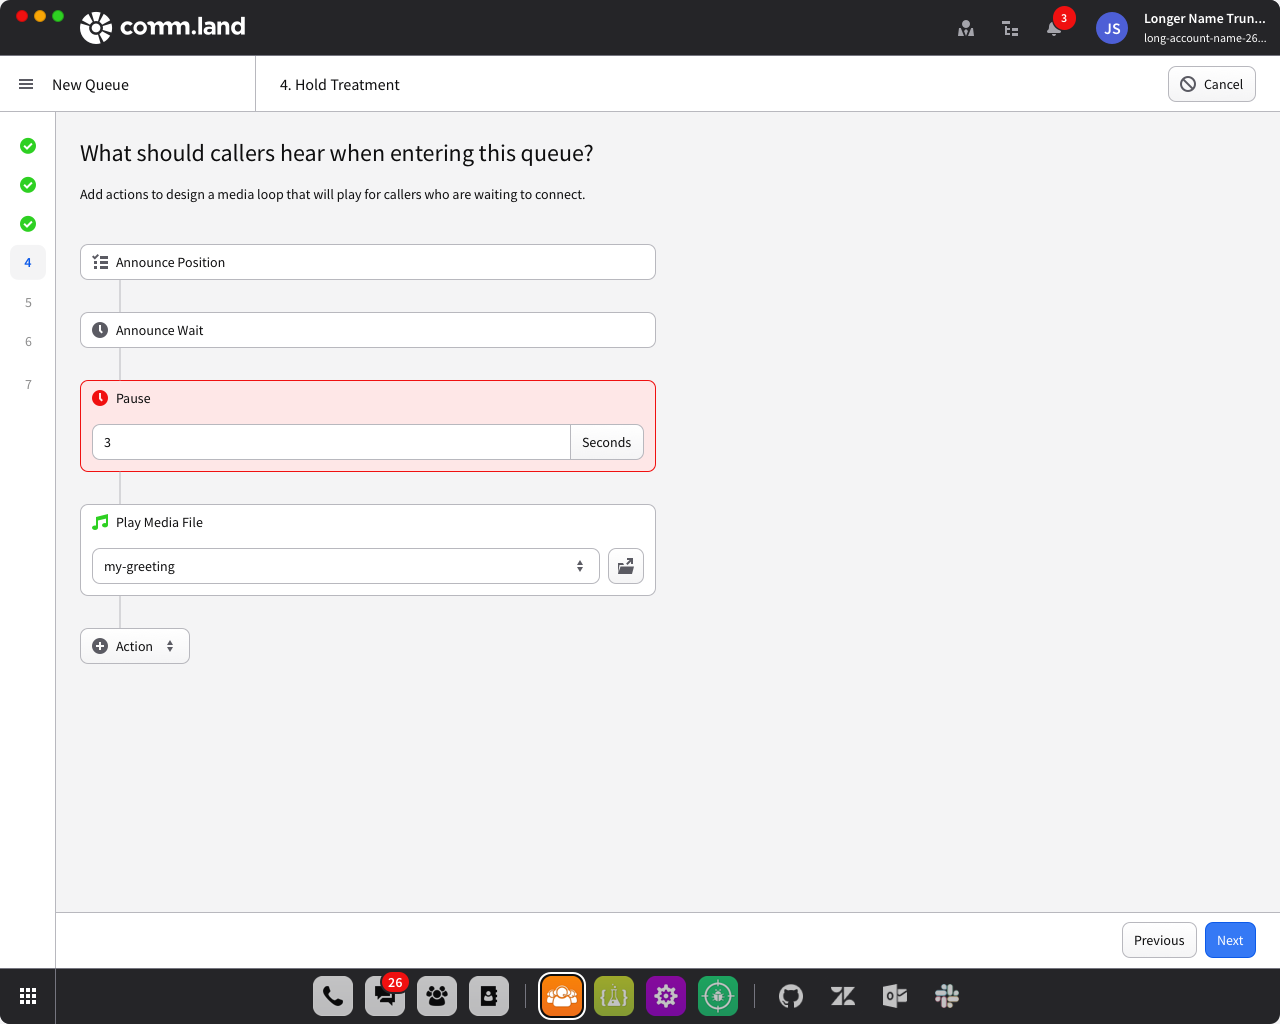
Hold Treatment
These settings define what a caller experiences while they are on on hold. From a dropdown menu, you will select from the list of below actions then can drag and drop or delete each action to create the exact hold treatment you’d like!
- Announce Position will tell the caller their number within the queue.
- Announce Wait will tell the caller their estimated wait time until their call is routed to an agent.
- Pause allows you to designate a set number of seconds between actions.
- Play Media File allows you to select a file (an uploaded file or a stream URL [either mp3 or shoutcast)
- The designated hold treatment will automatically loop during the hold for as many seconds you defined in the General Settings, so there’s no need to duplicate an event in the loop.
Agent Behavior
This page allows you to configure certain actions within the queue depending upon the agent’s behavior and status. You will set the amount of seconds a call will ring at an agent’s extension before it is sent to another agent or the next event in your callflow and can also toggle on/off a forced away state if an agent rejects or misses a call. You also have options to allow for and configure agent recovery time between calls.
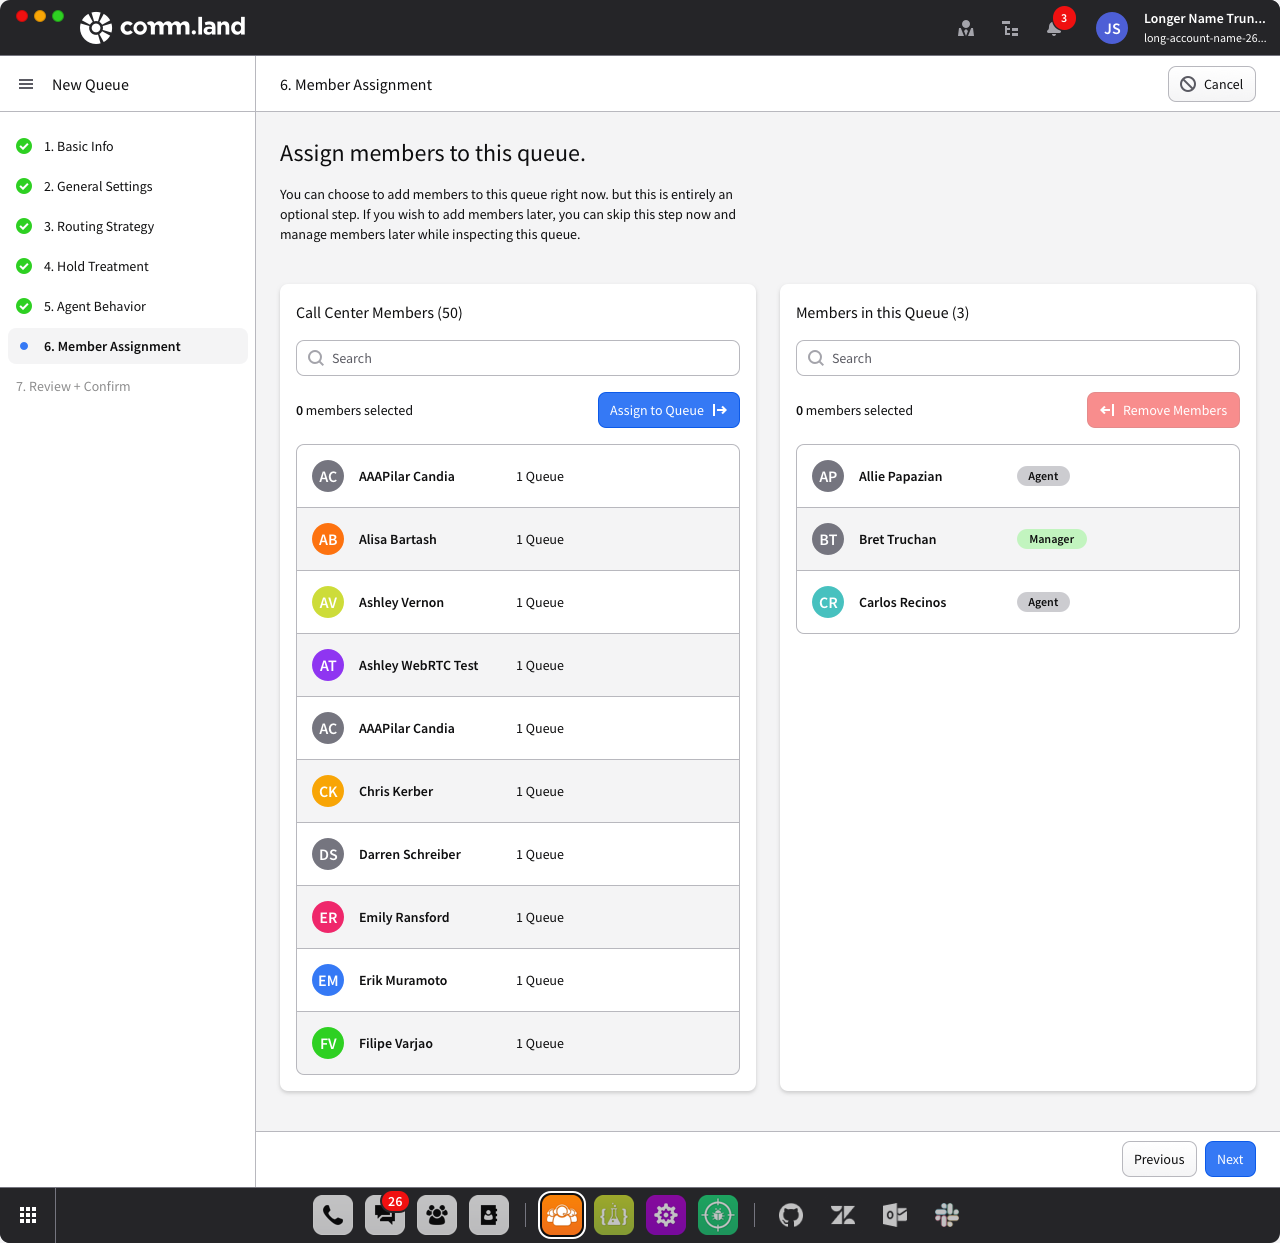
Member Assignment
The next step is optional and can be completed and updated as you get more familiar with the queue and member dynamics. If you choose to complete this step now, you will select agent(s) from the list of all Call Center agents on the left, assign each the role of agent/manager, and click “Assign to Queue.” If you skip this step, you can add agents/managers to the queue from the queue details page.
Review + Confirm
The final page presents you with an overview of all the settings. If everything looks correct, hit “Save” and you’ve built a queue!
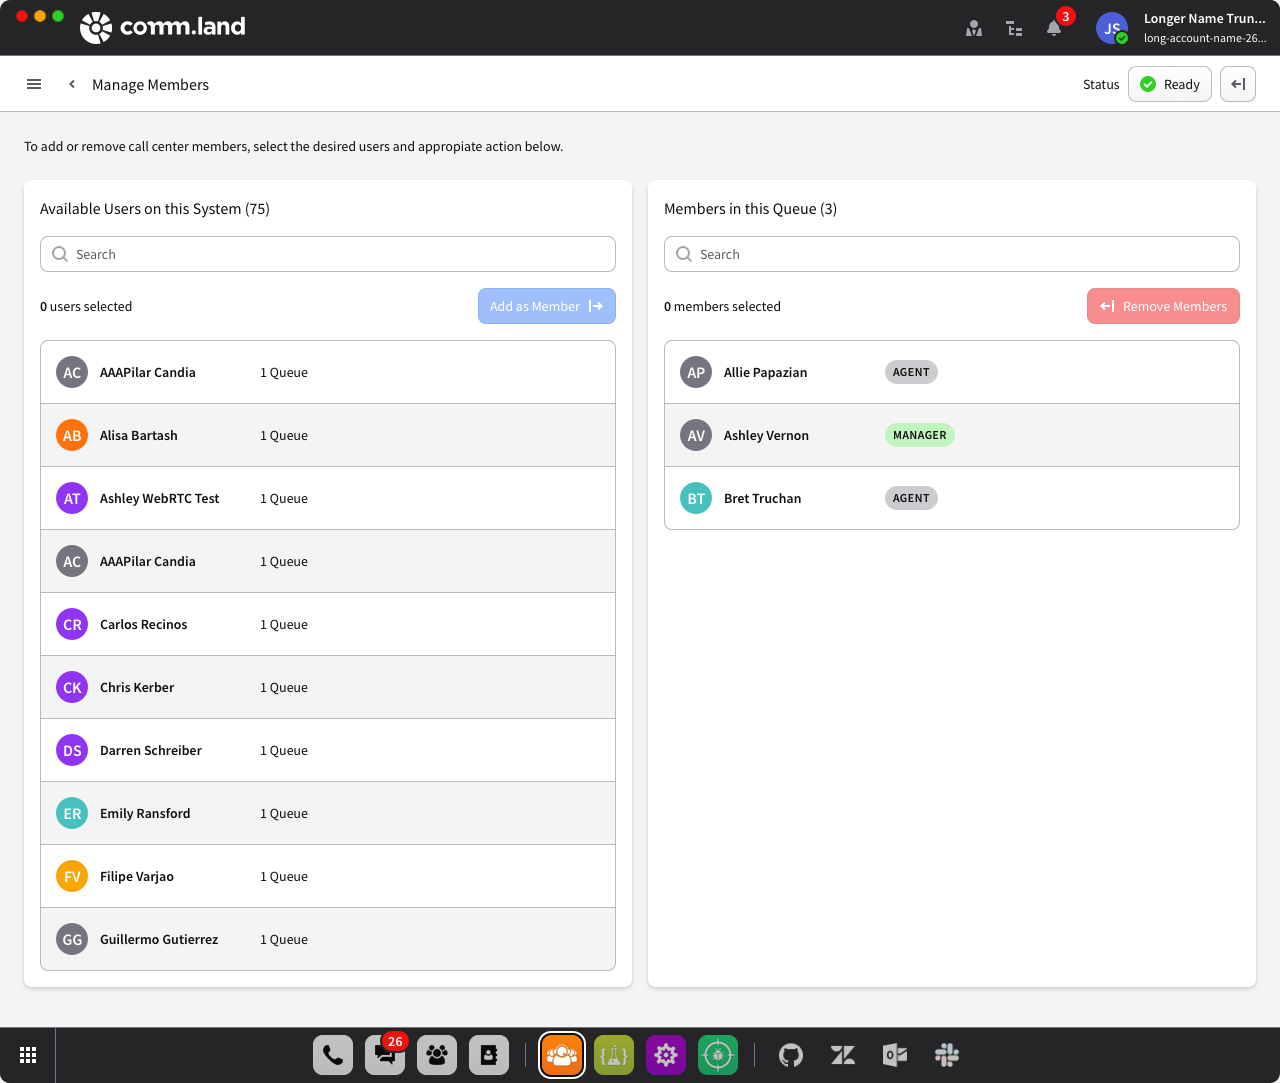
Members Page
Admins can manage member attributes here. The default screen will list all the members in the call center, and display the name, session duration (if active), the number and name of queues the agent is assigned to, a call recording toggle, and the skills assigned to that member. The “Manage Members” button takes you to a page similar to Member Assignment in creating a queue. However, here you are selecting users in your account and adding them as Call Center Members that you can assign to a queue elsewhere.
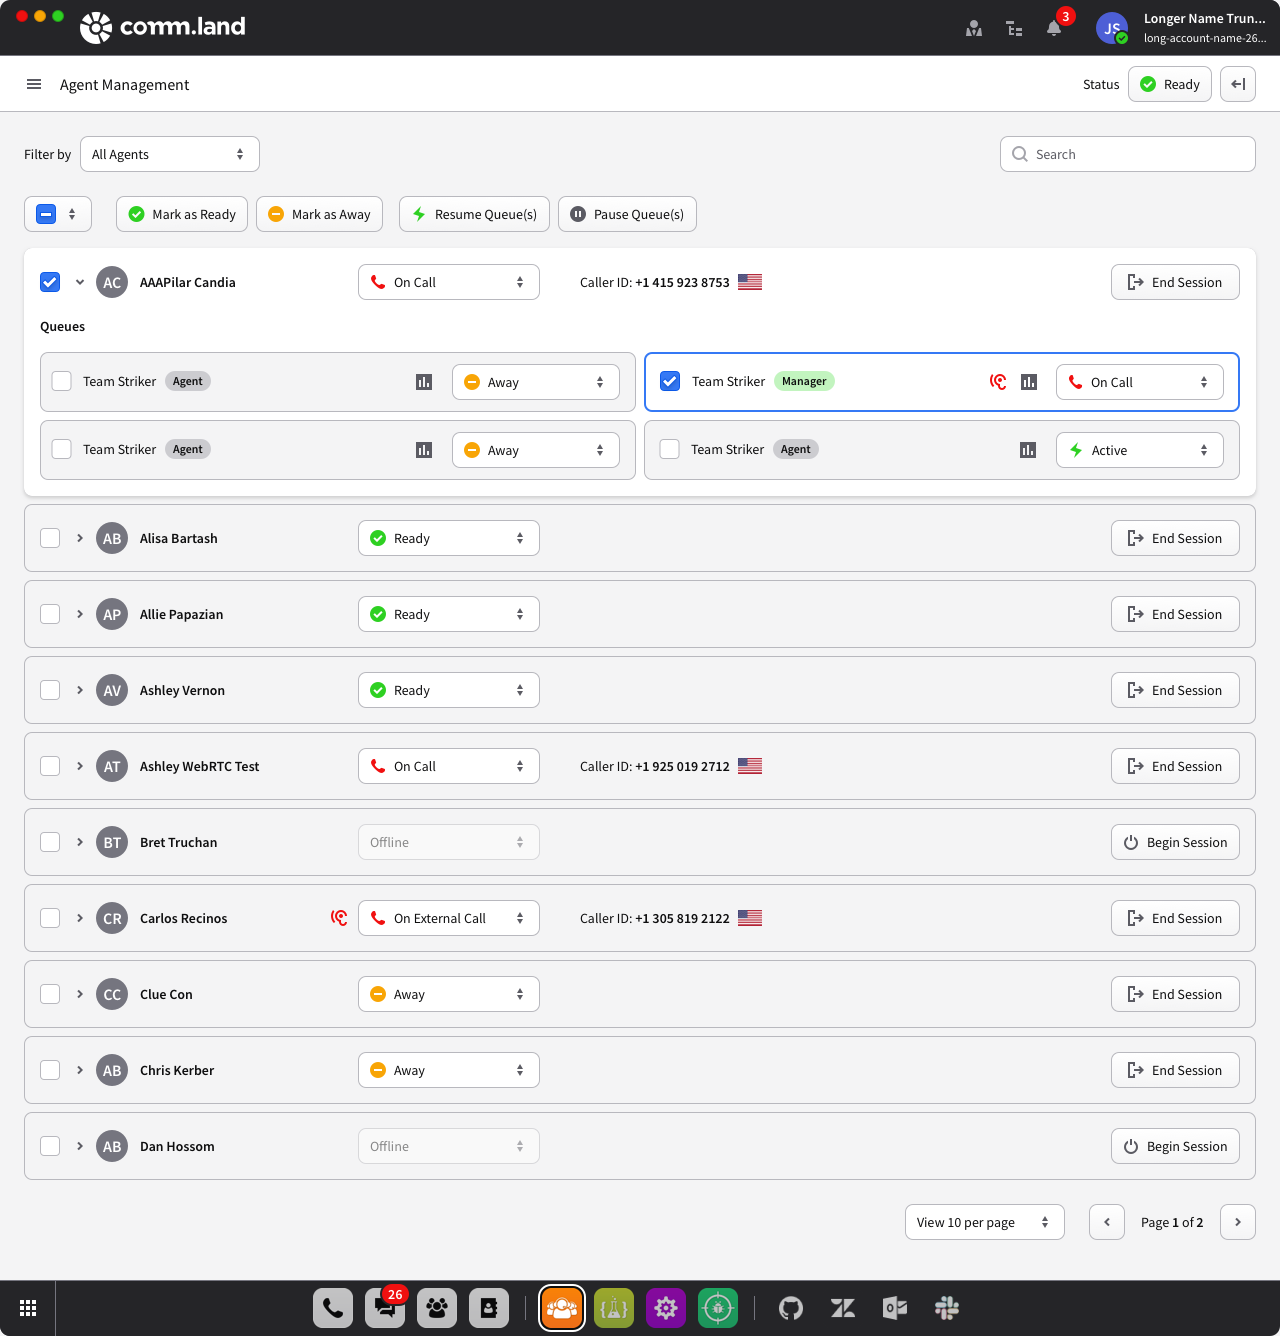
Agent Management (Pro Feature)
Managers and admins have access to the Agent Management page, which provides an overview of all agents managed (for managers) or all agents on the account (for admins). This list can be filtered according to agent state or searched.
Selecting an individual agent provides a quick view of their global agent state and which queues they are assigned to. The manager or admin can individually end an agent’s session and also individually or bulk set agent states.
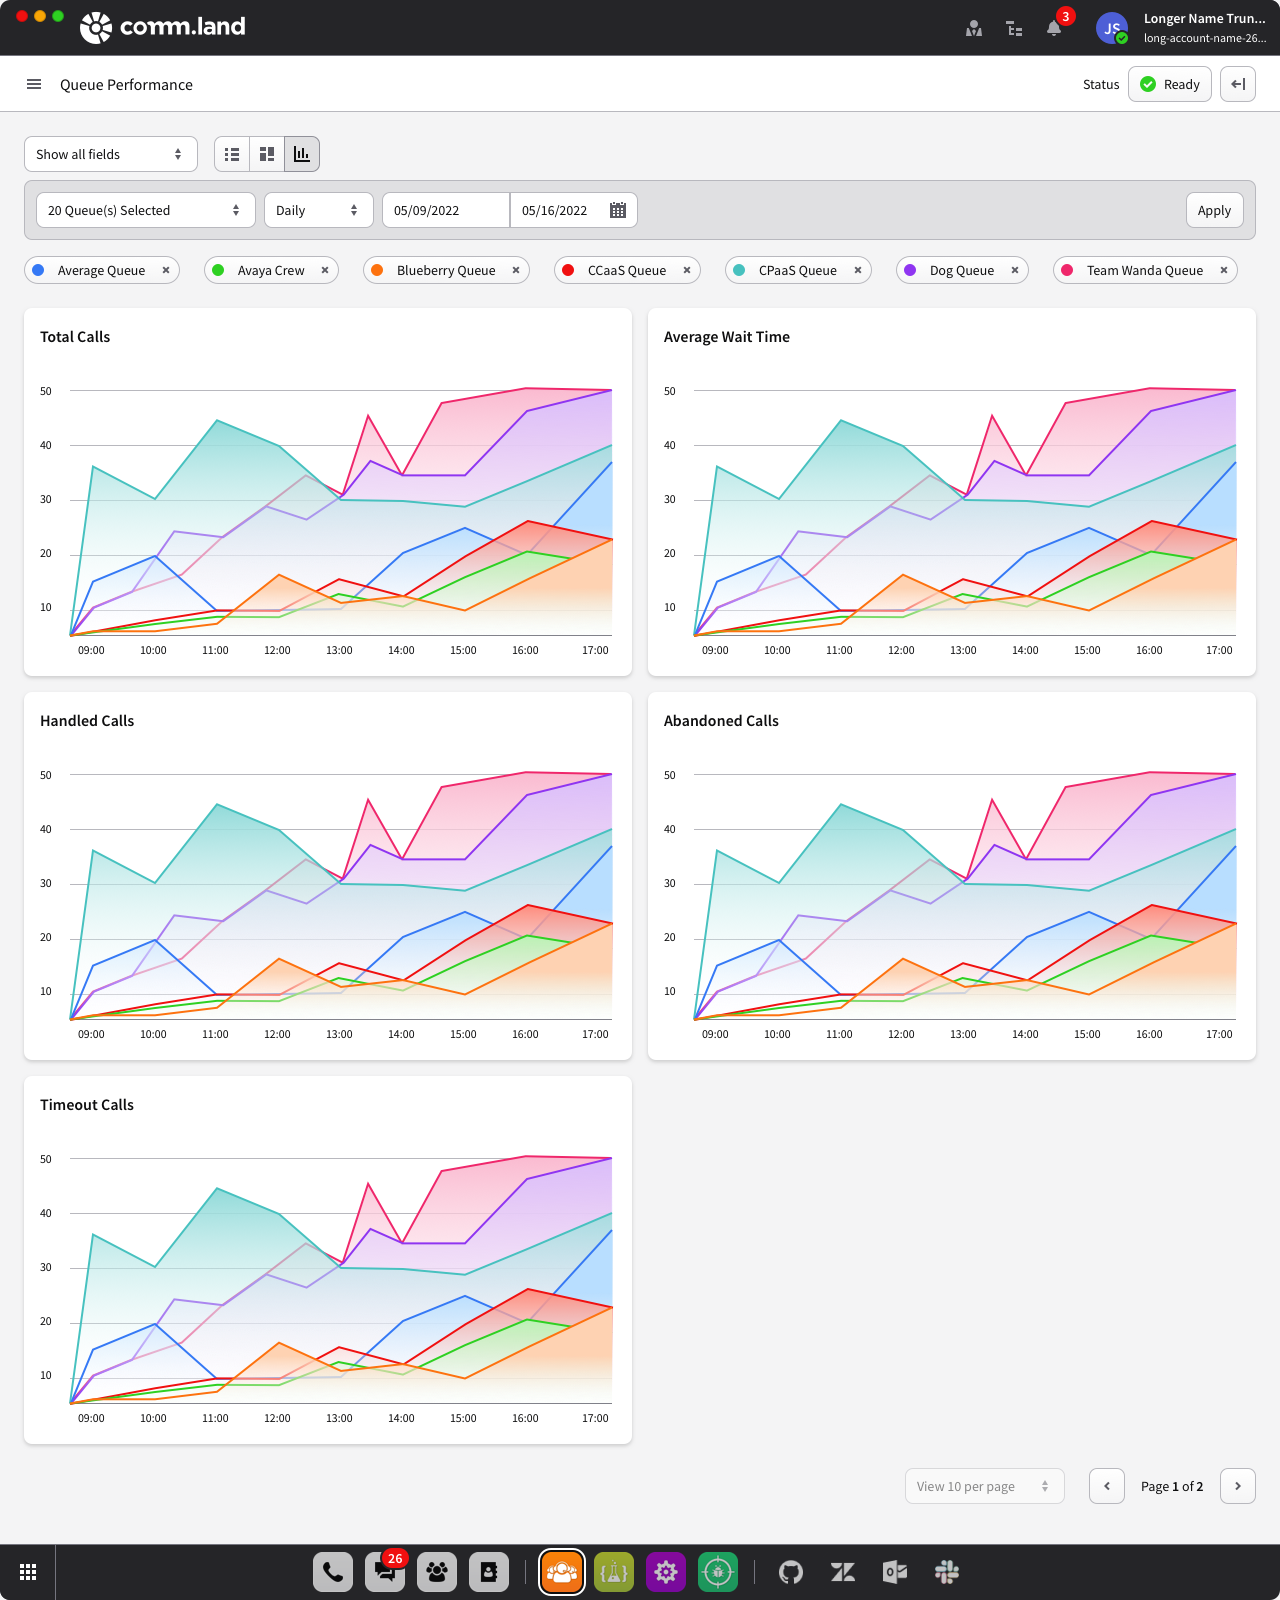
Agent Performance (Pro Feature)
Managers and admins can access the Agent Performance page to see metrics for all agents managed (for managers) or all agents on the account (for admins). The data presented can be filtered according to agent(s) selected, queue(s) selected, time period daily/weekly/monthly), and a date range. There is also the option to select which fields to display.
The last option a manager or admin has is to choose how the data is laid out — a list view, a cards view, or a graph view.
Settings
The Settings page is only accessible to the account admin and is where Pro Features are toggled on/off for the entire account.
Feedback
The Feedback page contains a module that allows users to submit feedback, suggestions, and issues directly from the UI. This data is sent directly to the 2600Hz engineers that built Call Center!