SmartPBX User Guide
The SmartPBX App combines the most common PBX functionality with a beautiful user interface. All services are controlled via API’s, allowing you to extend the App functionality as needed. Within the interface, create, manage and remove services for your users. You can quickly create new client accounts and specify what access you want to provide. Features such as individual fax-to-email boxes, call forwarding and hot-desking are easy to understand and implement.
NOTE: This documentation refers to the Monster UI implementation
SmartPBX Dashboard
The SmartPBX dashboard provides a comprehensive overview of your entire product offering. Within this dashboard, review the total users, devices and associated phone types, conference bridges, main numbers and conference numbers. Also view the total amount of spare numbers and assigned numbers.
NOTE: For a detailed look into the dashboard, go HERE.

Managing Numbers - Purchase, Port and Assign
Provide each user with their unique direct-dial phone and extension number. Assign a spare number within the Interface, or buy or port numbers and then assign the number. When a number is ported or purchased, it will populate the Spare Numbers tab. You can also set office hours strategy, office holidays, and select the way callers reach clients.

NOTE: We have also created a video describing managing numbers! You can find it here
Numbers in Use
This will give you a summary of the current numbers used by your account and who it is assigned to. The icons to the right of each name and number will show what settings have been enabled. You can view and edit these settings by selecting the gear to the far right.
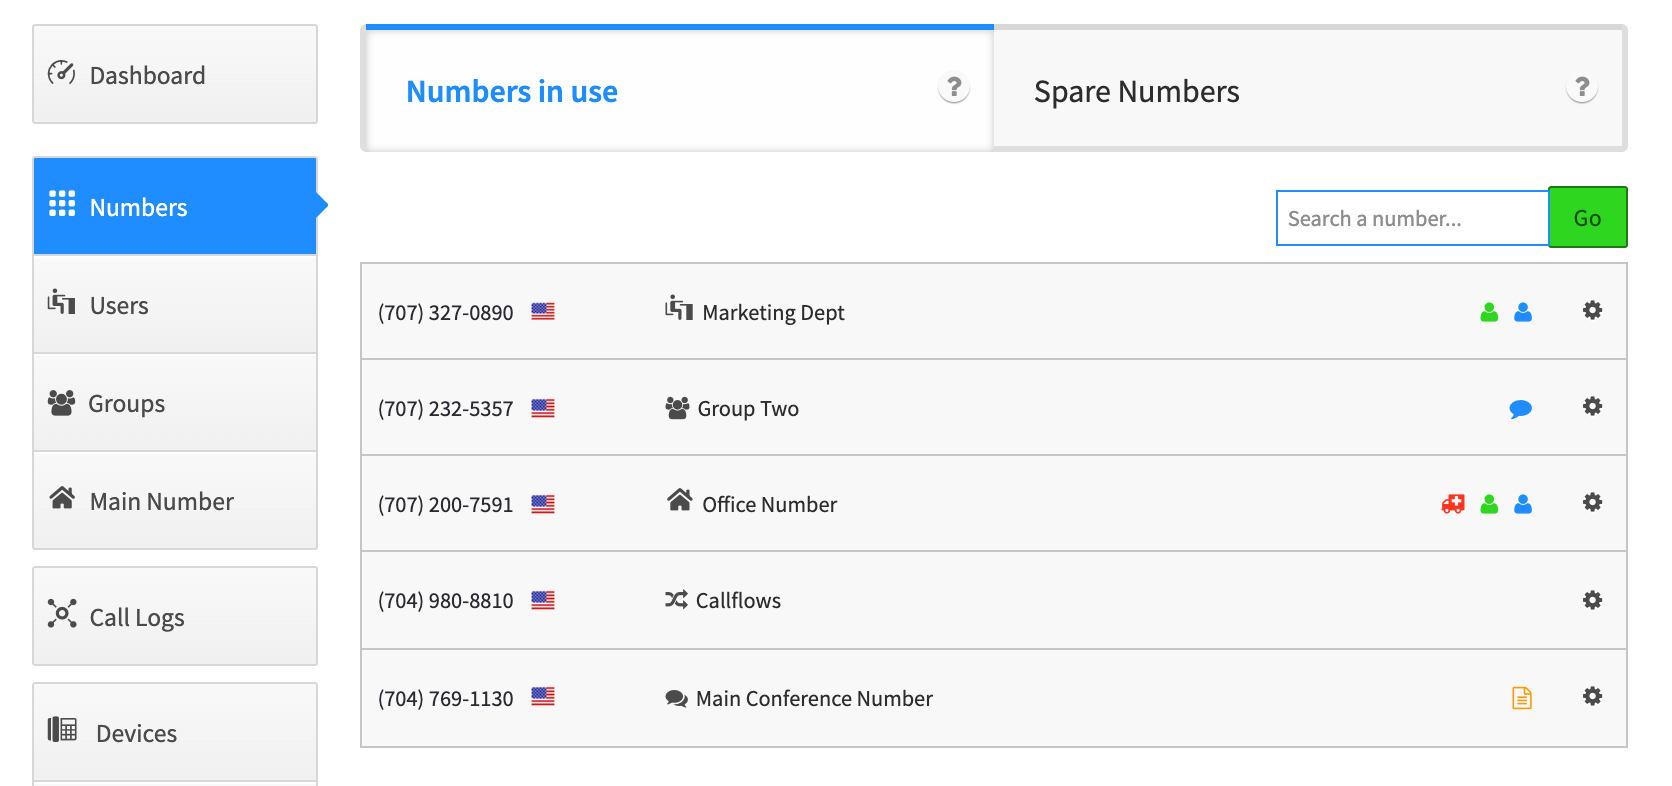
Spare Numbers
This tab will display any numbers available for you to use that you have already purchased, but not yet assigned. You can assign these numbers when you set up a new user.
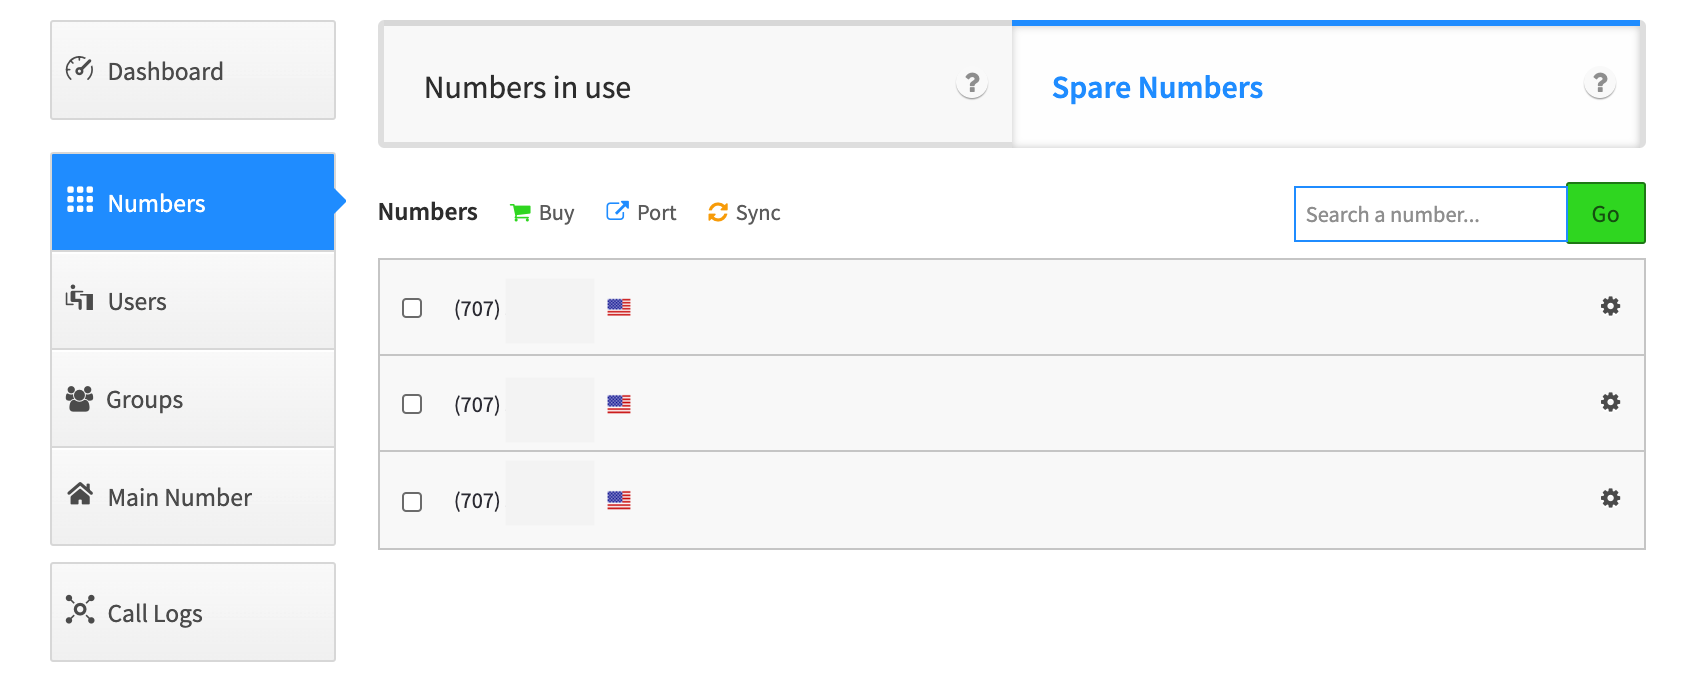
To Purchase a Phone Number - Optional
If you want to buy a number, you can select the “Buy” icon that is displayed when the Spare Numbers tab is selected.

Choose whether your number should be a toll-free or a Local number. Then you will see a dialog like below:
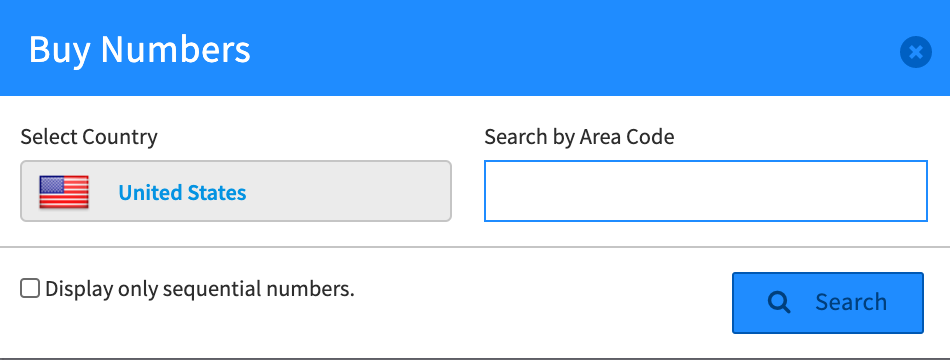
- Search for an available number by city or area code. You can then decide what and how many numbers to purchase
- Add one number or multiple and then click “Buy Numbers.”
- The number will be added to the “Spare Numbers” tab, which you will need to assign a number to a user.
To Port a Phone Number - Optional
You can also choose to Port an existing number you own to your new account.
NOTE:
This process can take up to two weeks, so make sure to give yourself time.
The link will forward you to our Porting manager app. This steps you though every detail and provides a tracking system to monitor the port process. We strongly recommend you refer to our

Check out Porting Manager App for additional documentation. The steps below are only a quick overview of the process.
Adding Users Once you have your list of numbers you can add users and assign both numbers and devices.
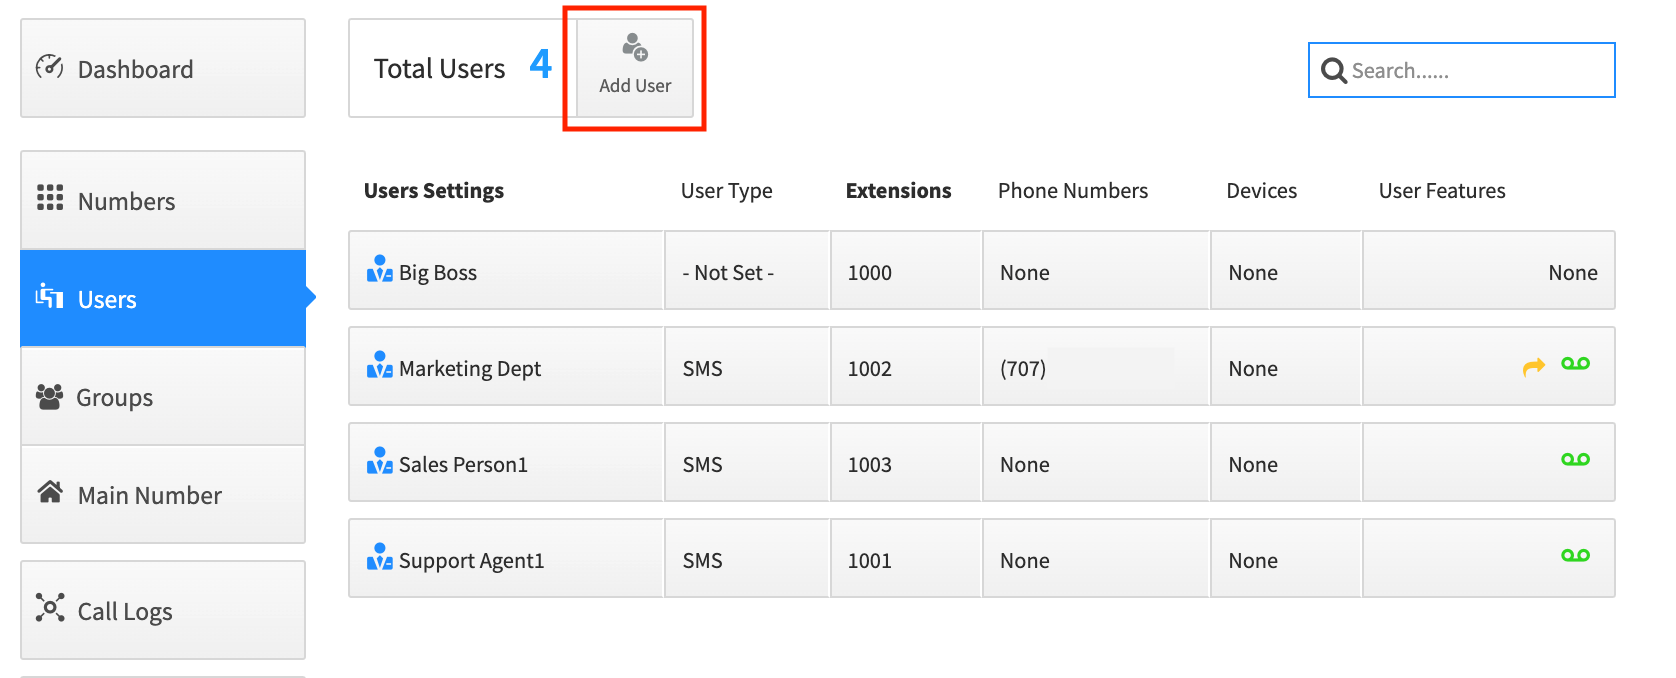
Select the “Add User” button at the top, to get started.
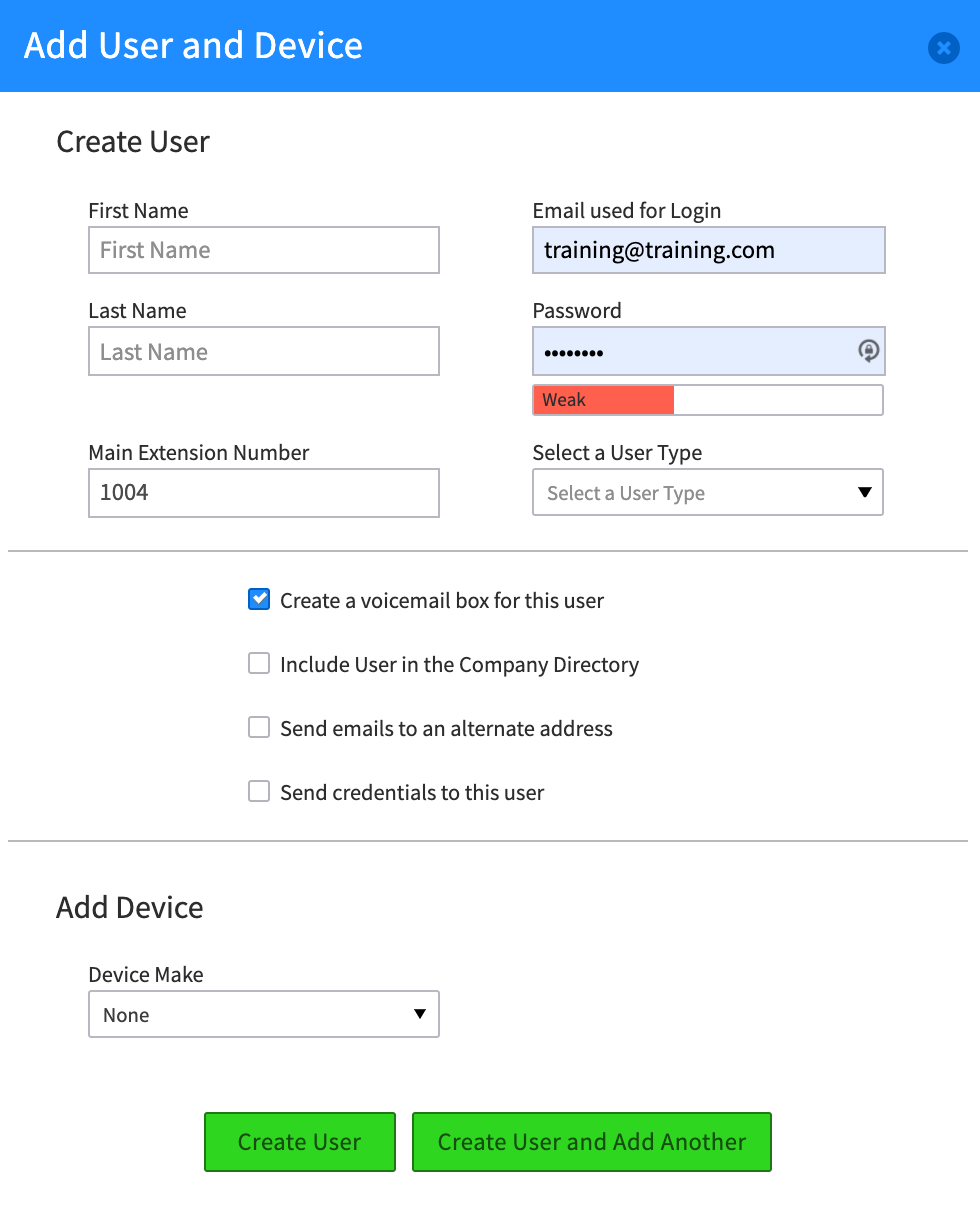
For more details on the settings here, please refer to the companion STEP guide, HERE.
NOTE: We have also created a video describing adding users! Check out our link to SmartPBX videos
Assign Numbers to a User Already Added
If you have added users before you purchased your numbers, you can follow the steps below
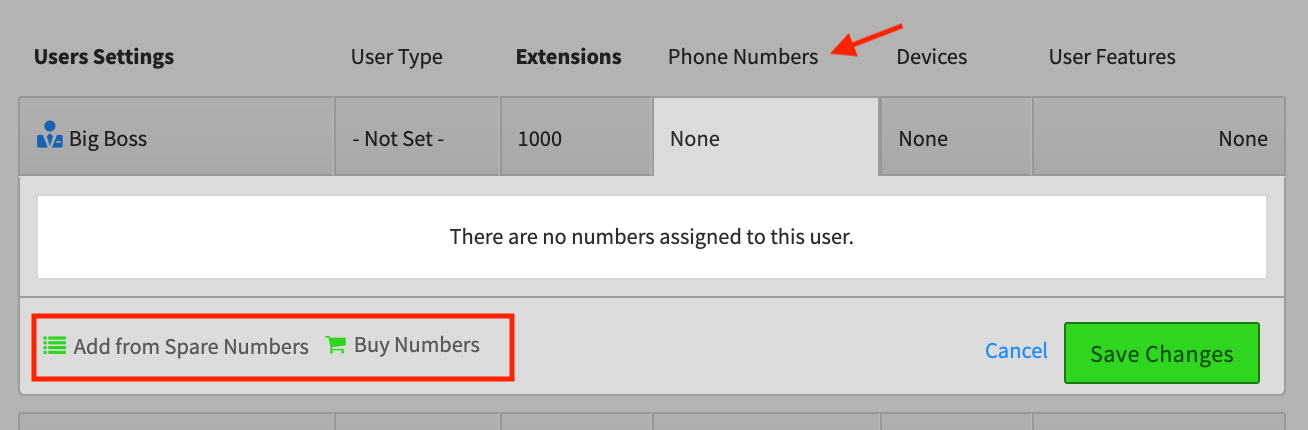
- Within the “Users” tab, search for the user you want to add/update, and click on the “Phone Numbers” button for the specific user.
- Click on the “Add from Spare Numbers” button.
- Select what Spare Number you would like assigned to the user.
- Once you have chosen a spare number click “Add Selected Numbers.” This will link the number with the user in a few seconds.
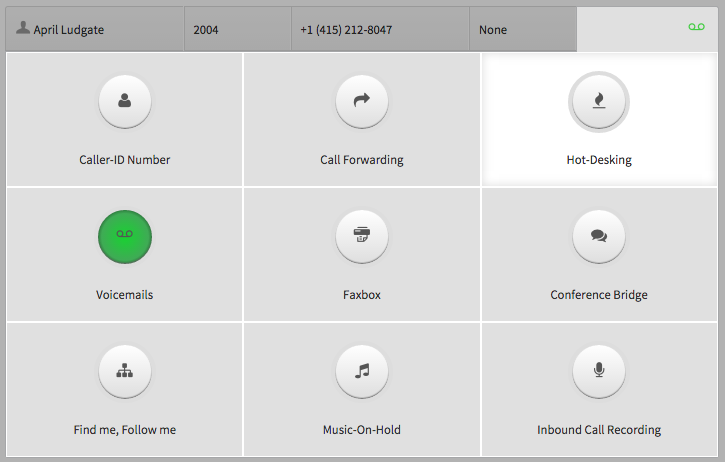
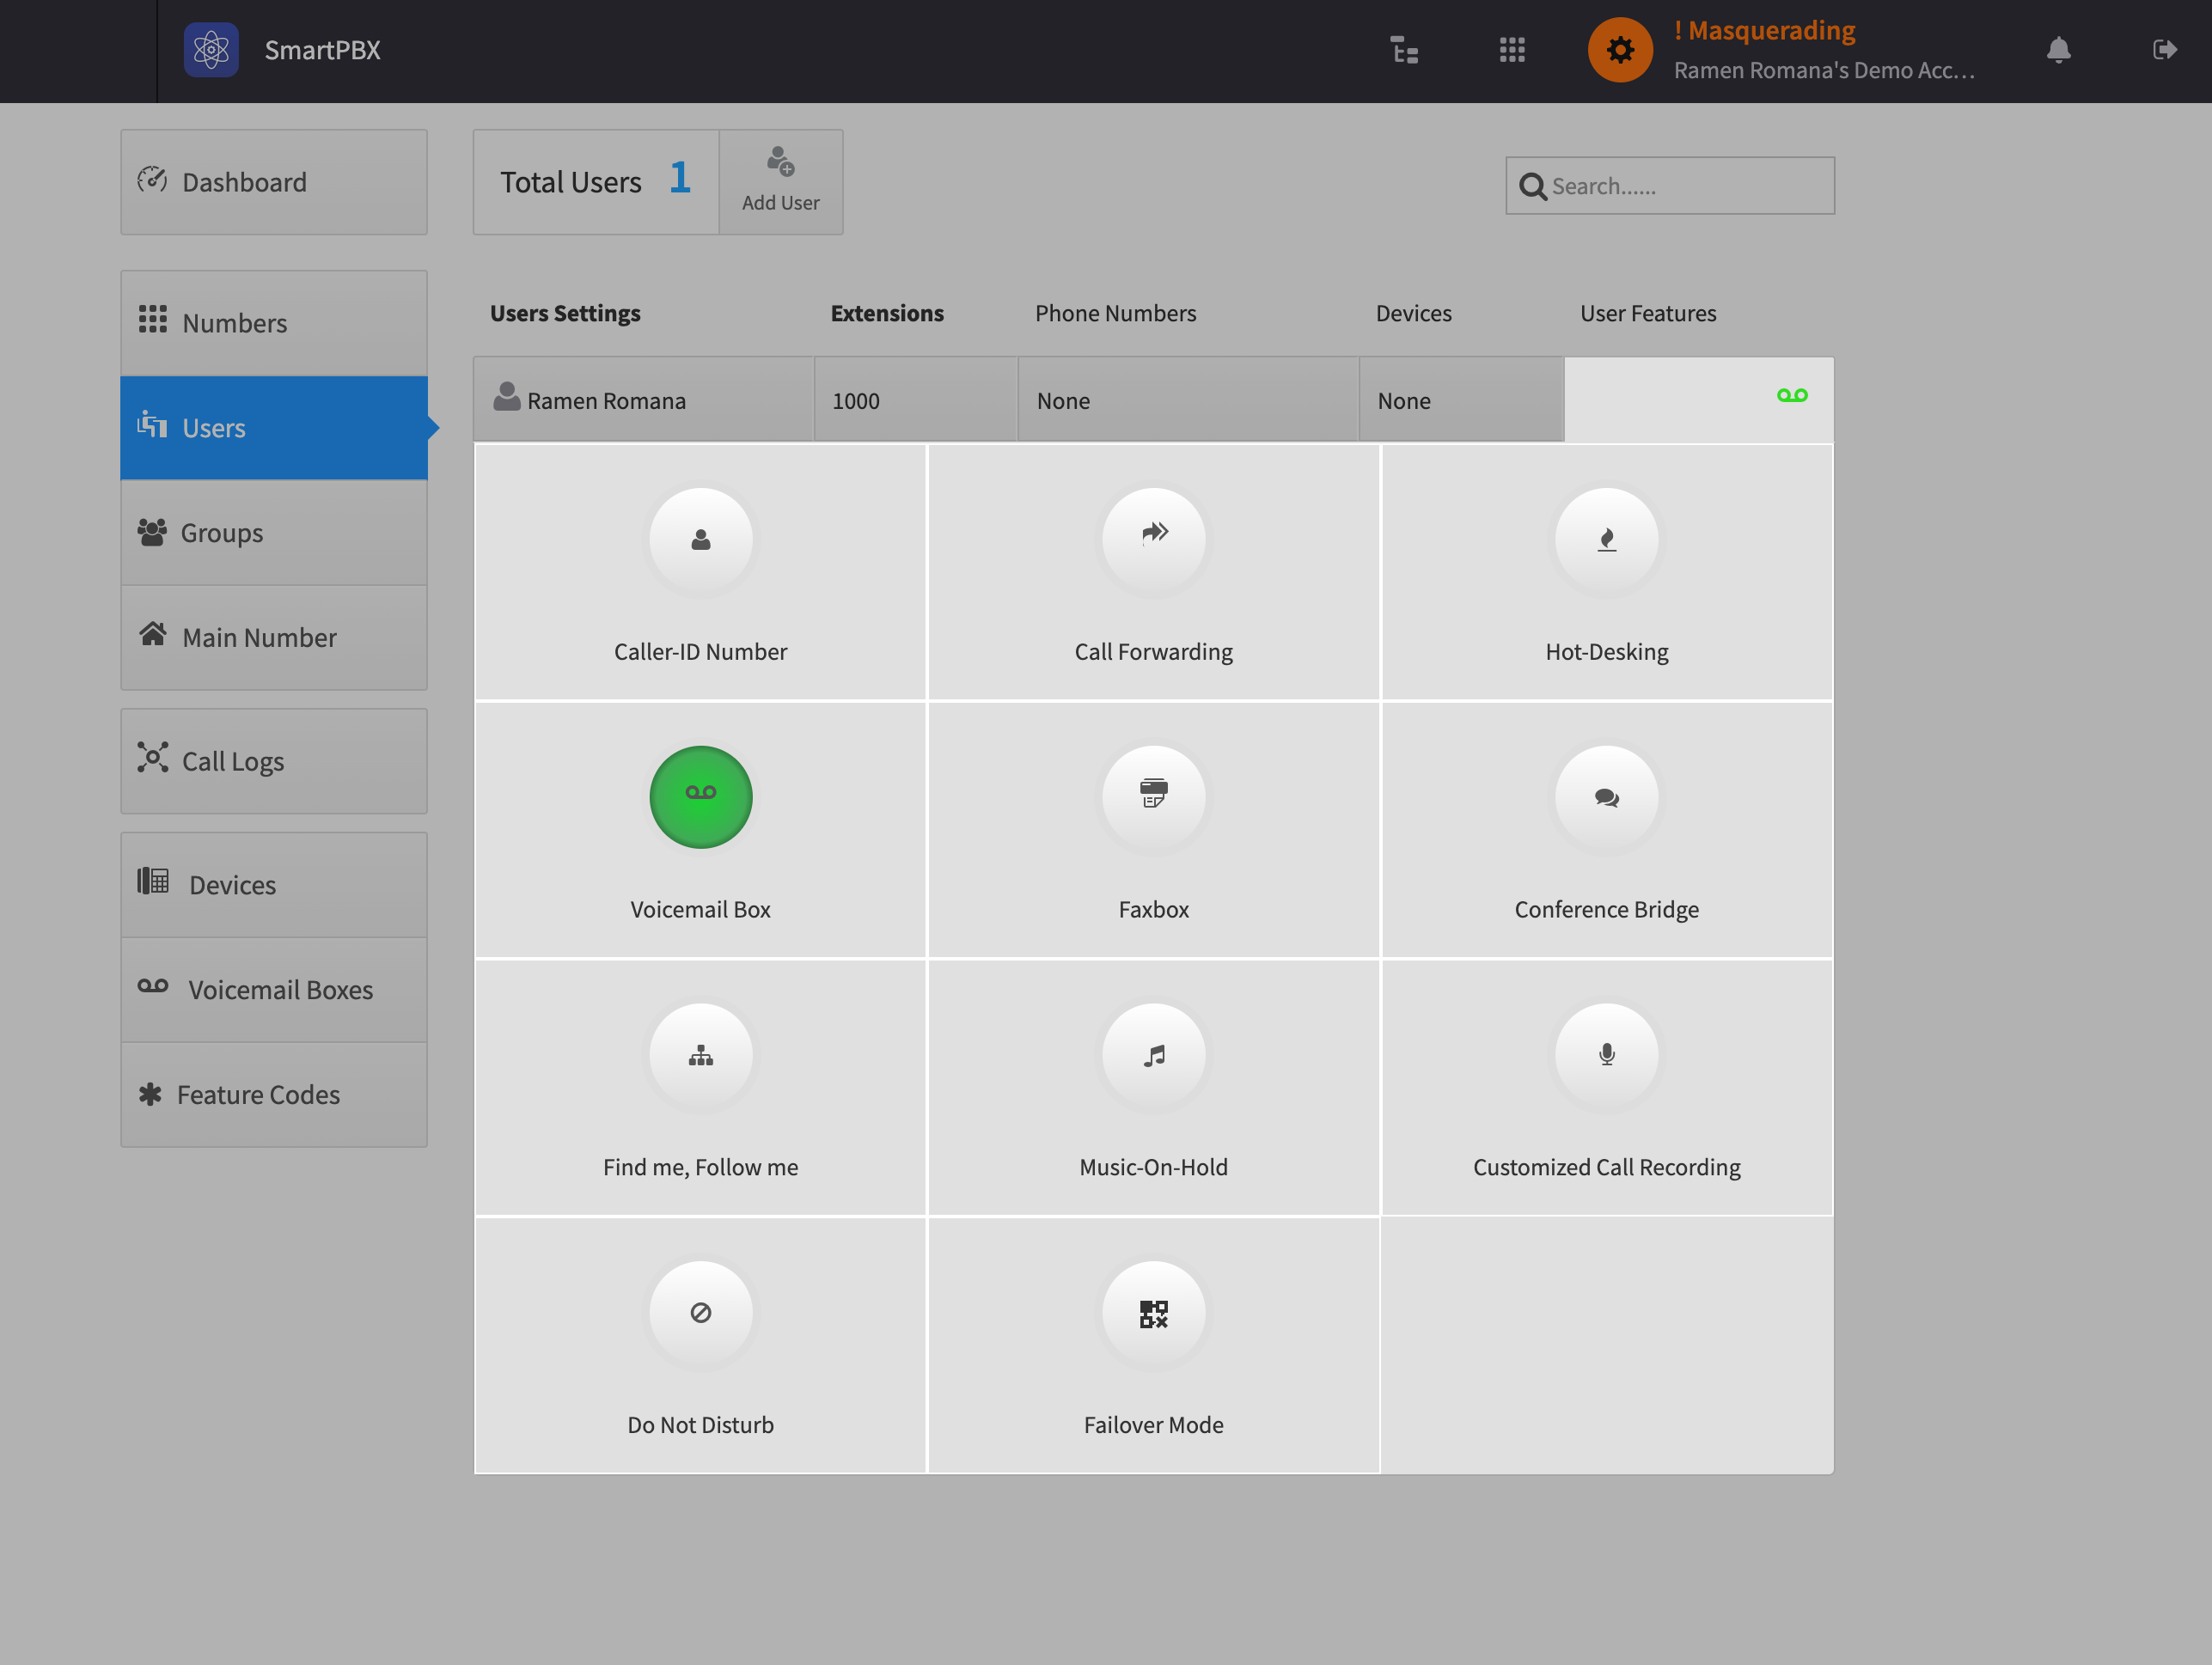
Manage User Features
Manage what features your users can access. Turn on/ off and manage Caller ID, Call Forwarding, Hot Desking, Voicemails, Faxbox, Conference Bridge, Find Me, Follow Me, Music-On-Hold and Inbound Call Recording.
To Access User Features
- On the “Users” tab of SmartPBX, just left of the dashboard.
- Within the “Users” tab, click on the “User Features” button for the specific user.
- This will show all available User Features, click on a specific feature and enable.
Call Failover: Designed for resilience, the Call Failover module activates when the primary line/user devices are unreachable. It ensures that calls are rerouted to a pre-specified secondary number or device, thus minimizing the chances of missing important calls due to unforeseen service interruptions.
Call Forwarding: This module enables users to redirect incoming calls to another number, extension or even voicemail box. It’s particularly useful when you are unavailable at your primary location or if you wish to redirect calls to a colleague or a different department.
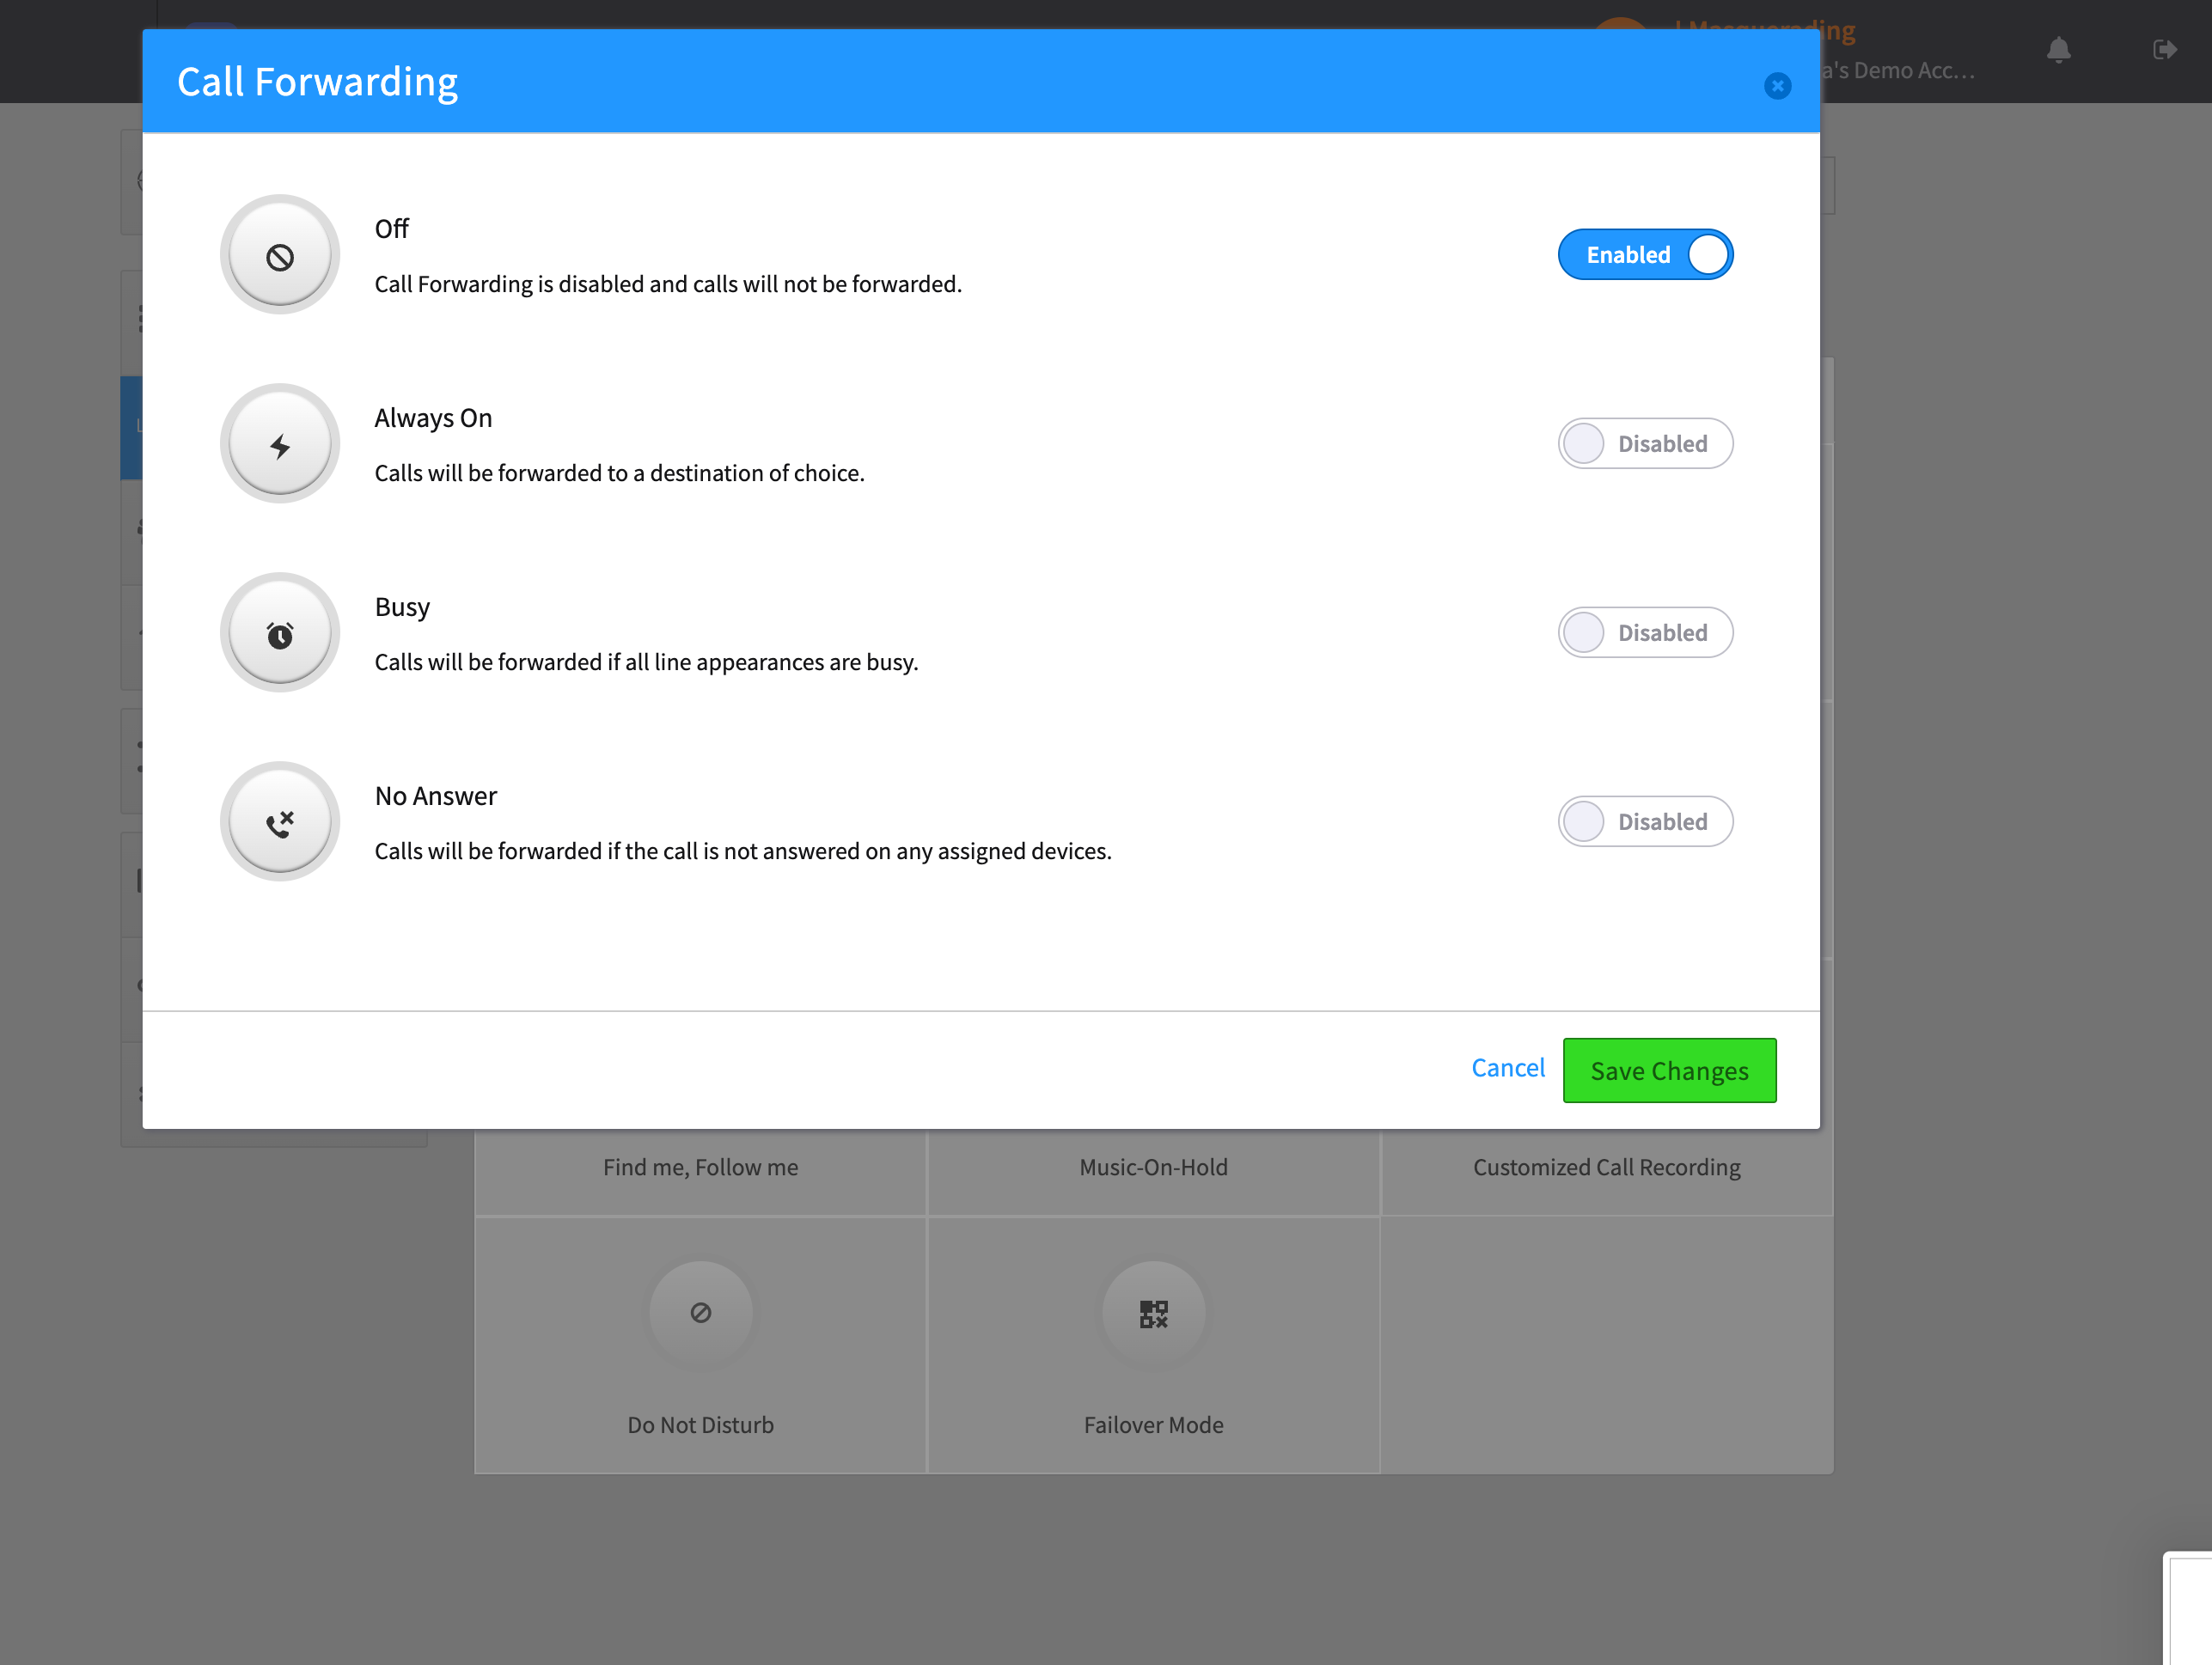
Call Forwarding Status: This toggle is set to ‘Enabled’, which activates the Call Forwarding feature. When ‘Disabled’, all Call Forwarding rules are inactive, and incoming calls will not be forwarded according to the settings below.
- Off: When selected, Call Forwarding is disabled, and all calls will be received by the original destination without being forwarded.
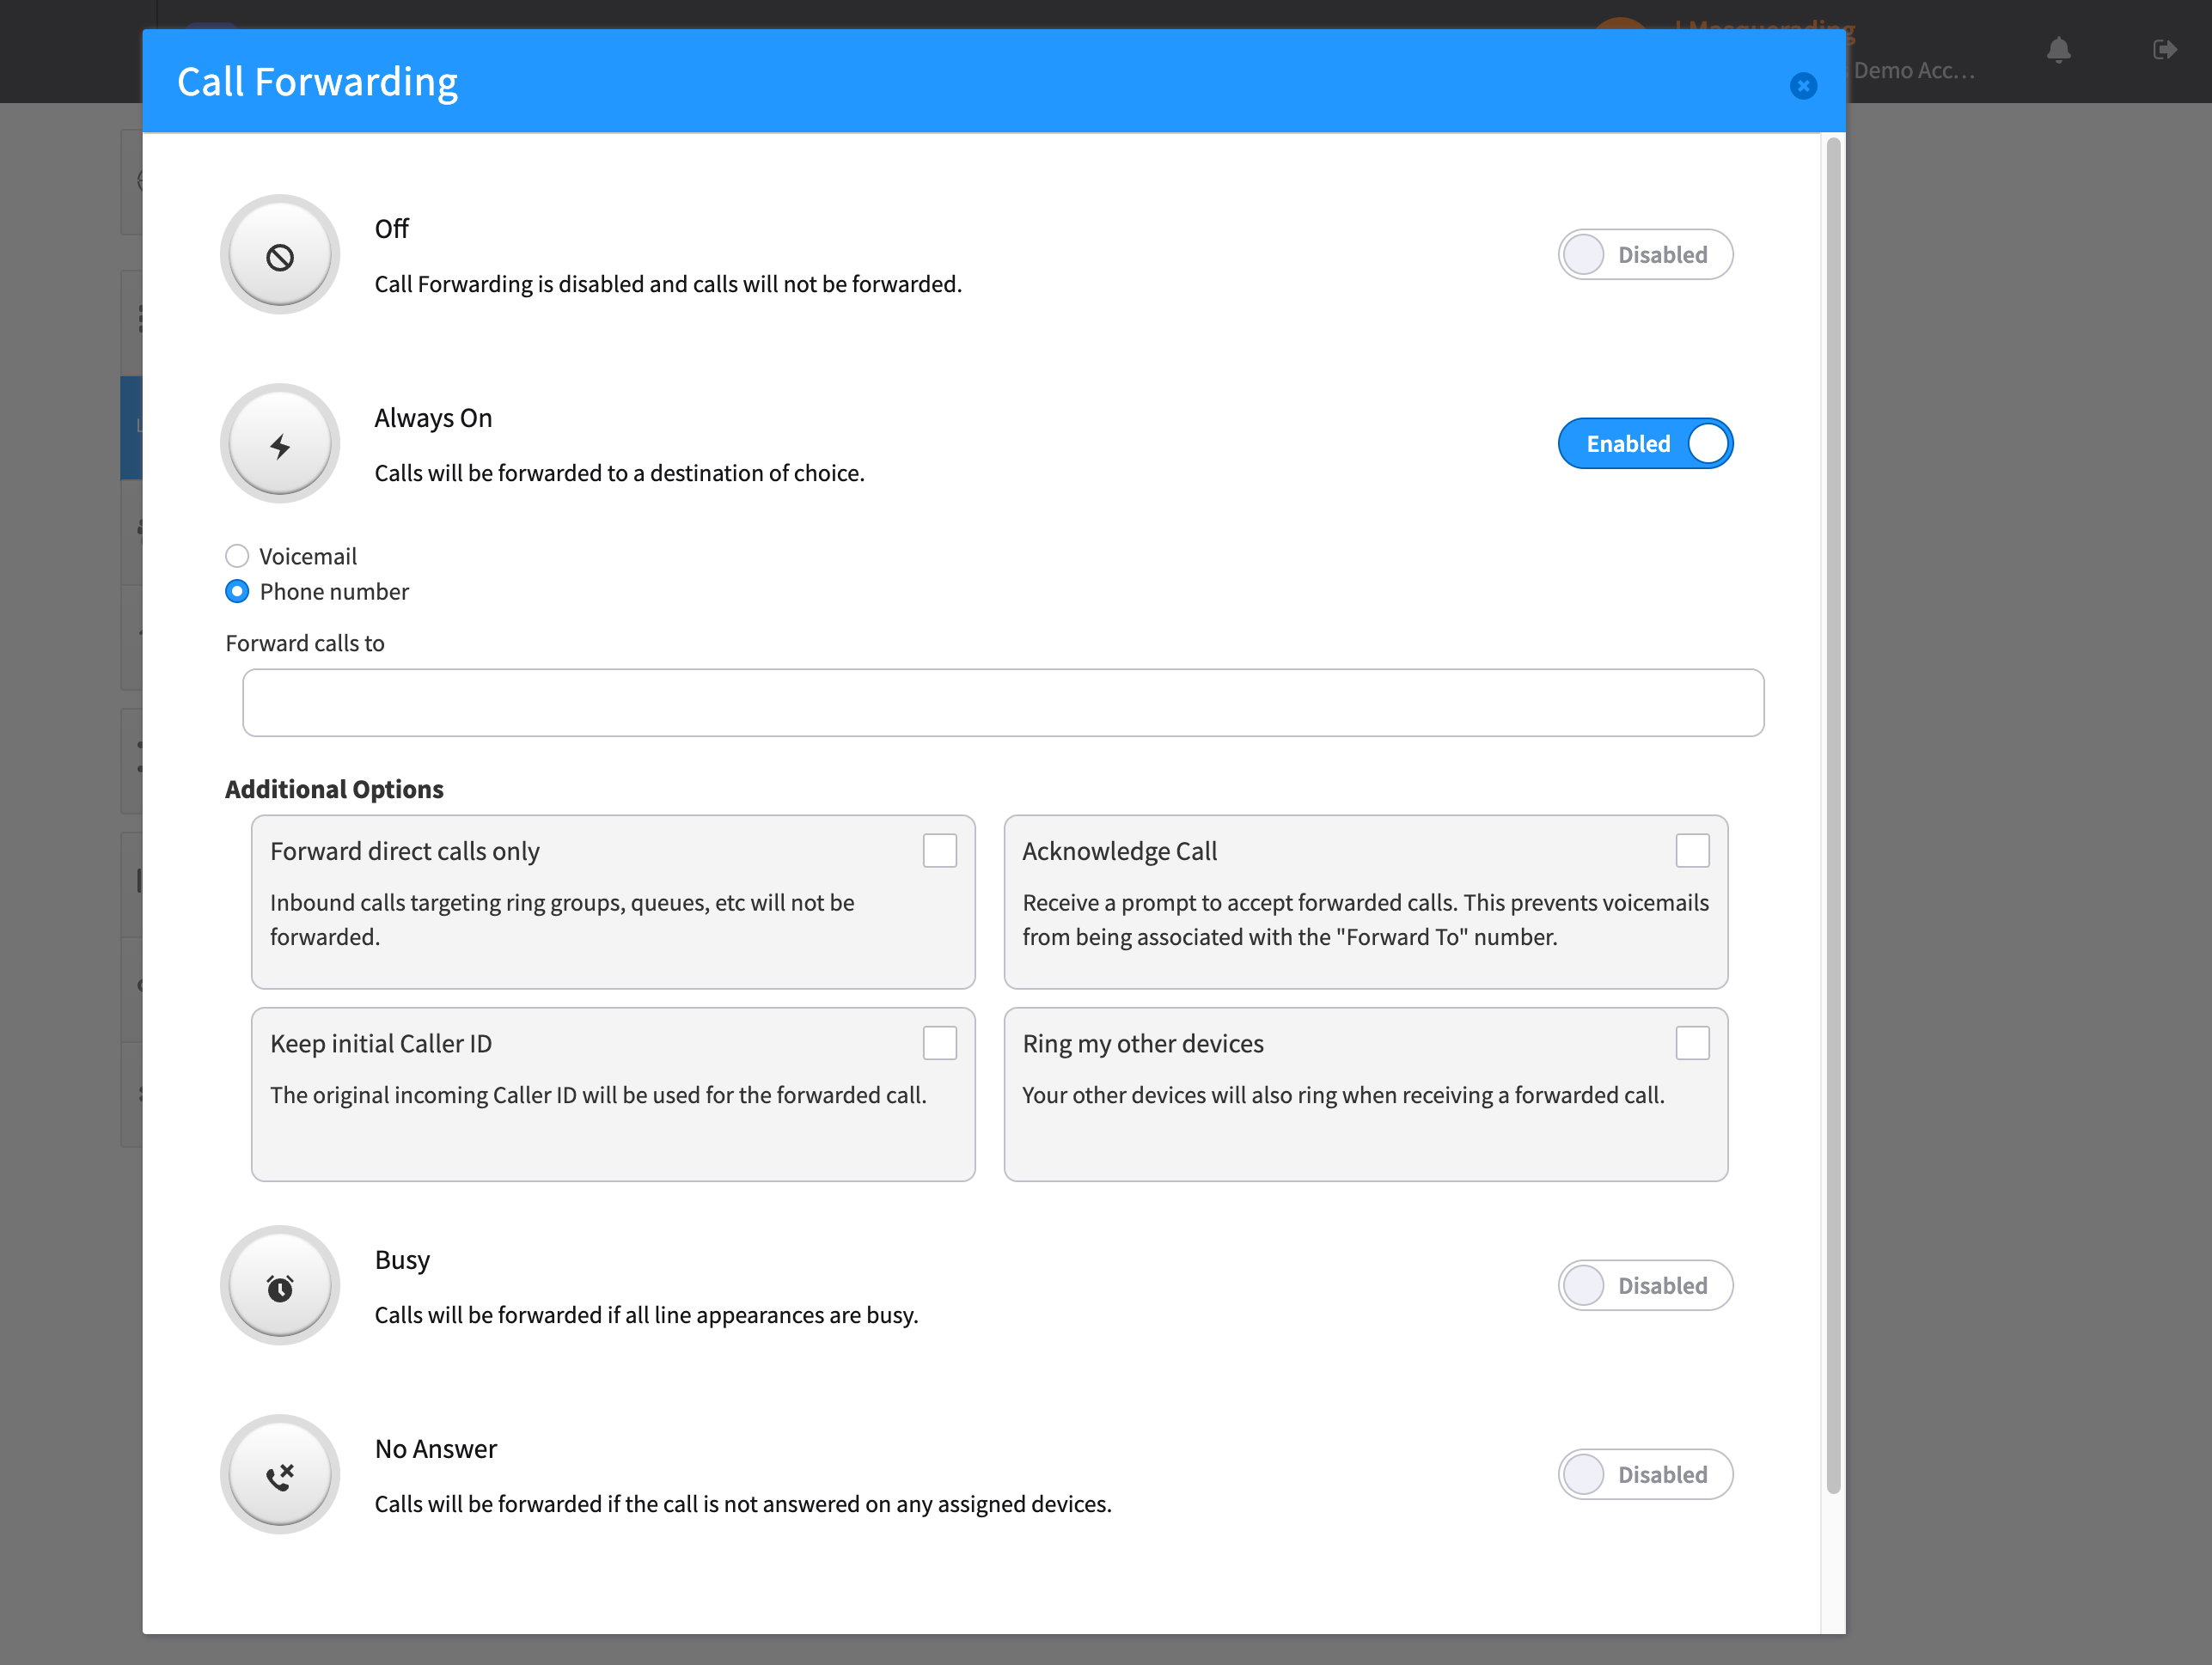
- Always On: Activating this setting will forward all calls to a specified destination regardless of the status of the original line.
- Busy: This setting is used to forward calls only when all line appearances are busy.
- No Answer: Calls will be redirected if the call is not answered on any assigned device within a set number of rings.
Note: The default callflow for users is set to redirect calls to the
voicemail box, as Kazoo does not have a direct feature for this.
Forward calls to selected Phone number with additional controls being:
- Forward direct calls only: This option ensures that only calls made directly to your number are forwarded. Calls to any group numbers, such as those made to ring groups or queues that you are a part of, will not be forwarded.
- Keep initial Caller ID: Enabling this feature will retain the original caller’s ID information when a call is forwarded. This means that the forwarded call will show the original caller’s number rather than the number the call was forwarded from.
- Acknowledge Call: When this is enabled, you will receive a prompt before a forwarded call is connected. This serves as a notification that the call is being forwarded and gives you the option to accept or reject the forwarded call.
- Ring my other devices: With this option enabled, other devices associated with your account will ring simultaneously when receiving a forwarded call, allowing you to answer the call from any of your devices.
Create and Manage User Groups
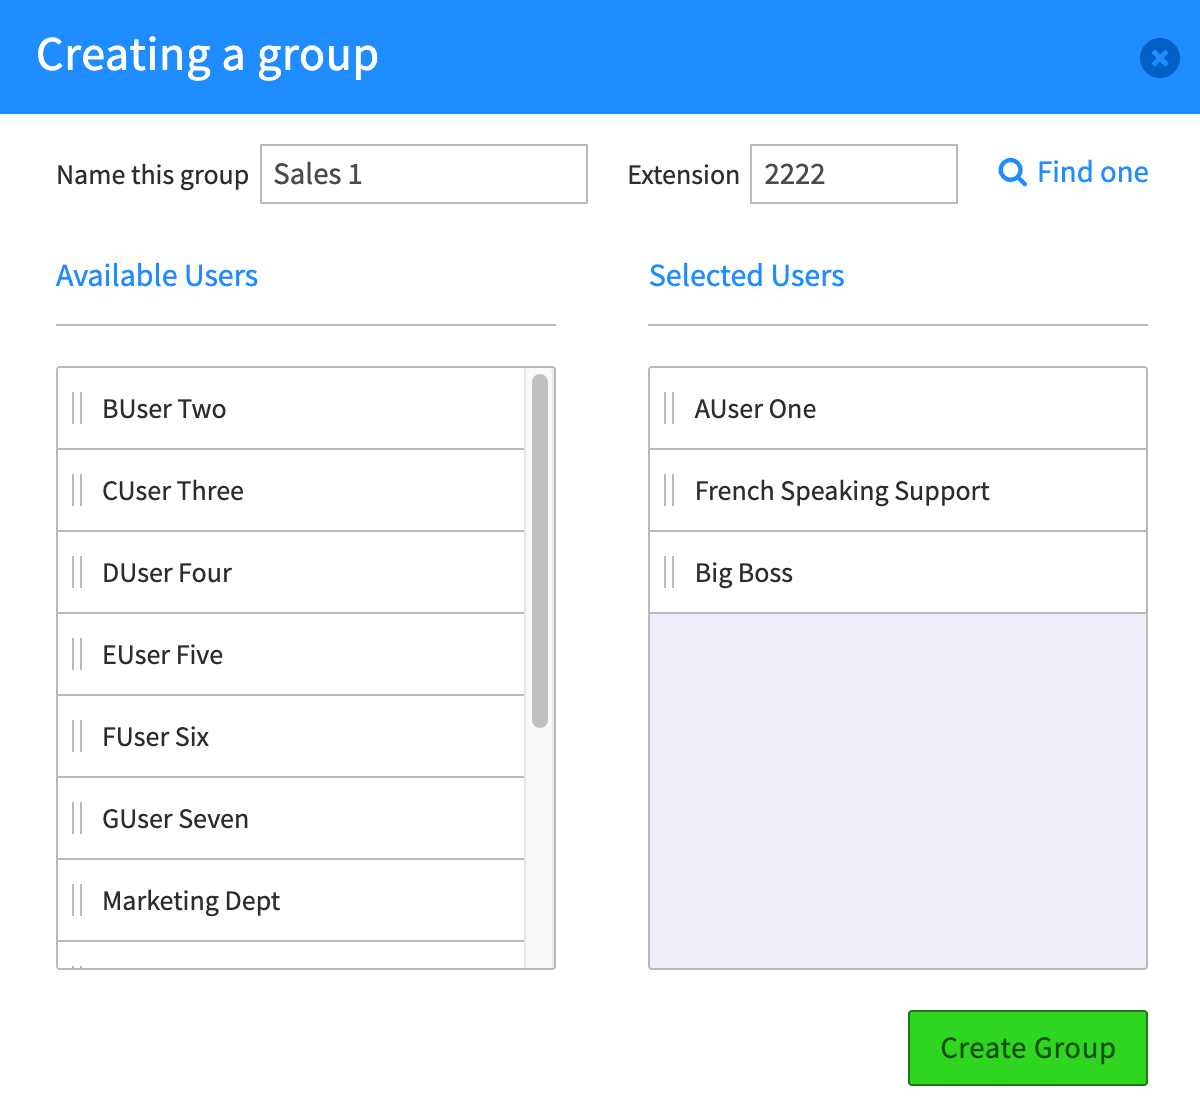
Once you have created your users, you can begin creating user groups. This is extremely useful if you have users that work in the same department, such as a sales or marketing team. Stay organized by creating multiple groups, while simultaneously adding new users.
-
Click on the “User Groups” tab of SmartPBX, just left of the dashboard.
-
Within the “User Groups” dashboard, click on the “Add Group” button.
-
The interface has a handy drag and drop. Drag the available users over to selected users, create a name for your new group, and add a number and if possible an extension.
-
Once you have created a User Group, it will be added to the list on the Groups home page.
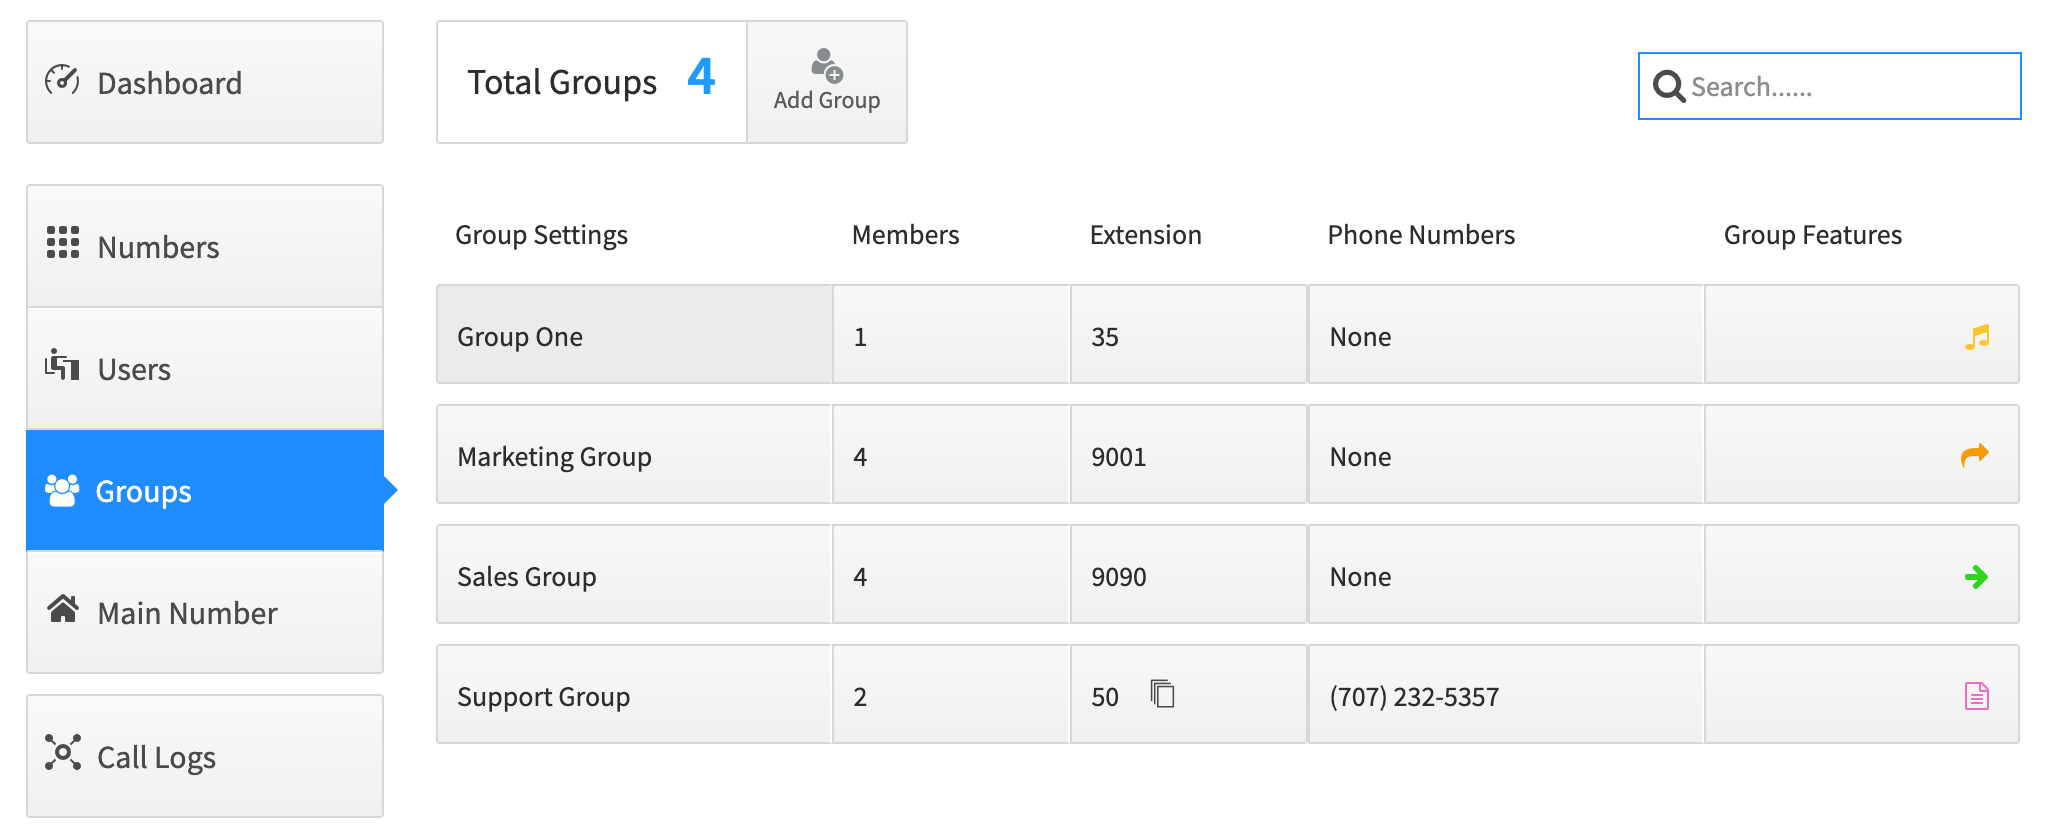
From here you can manage the group name, members, extensions, phone numbers, and group features by selecting the name at the top of the column.

- Call Recording This will toggle a call recording option to on.
NOTE: This call recording feature has time limits and is subject to privacy issues as the recording is saved to a local drive. It is recommended you instead use the Call Recording app. which when set up correctly, will save files in a secure external server, such as Amazon Web Services. Please contact your administrator for more information.
-
Ringback This defines the hold sound when a caller is parked in the ring group.
-
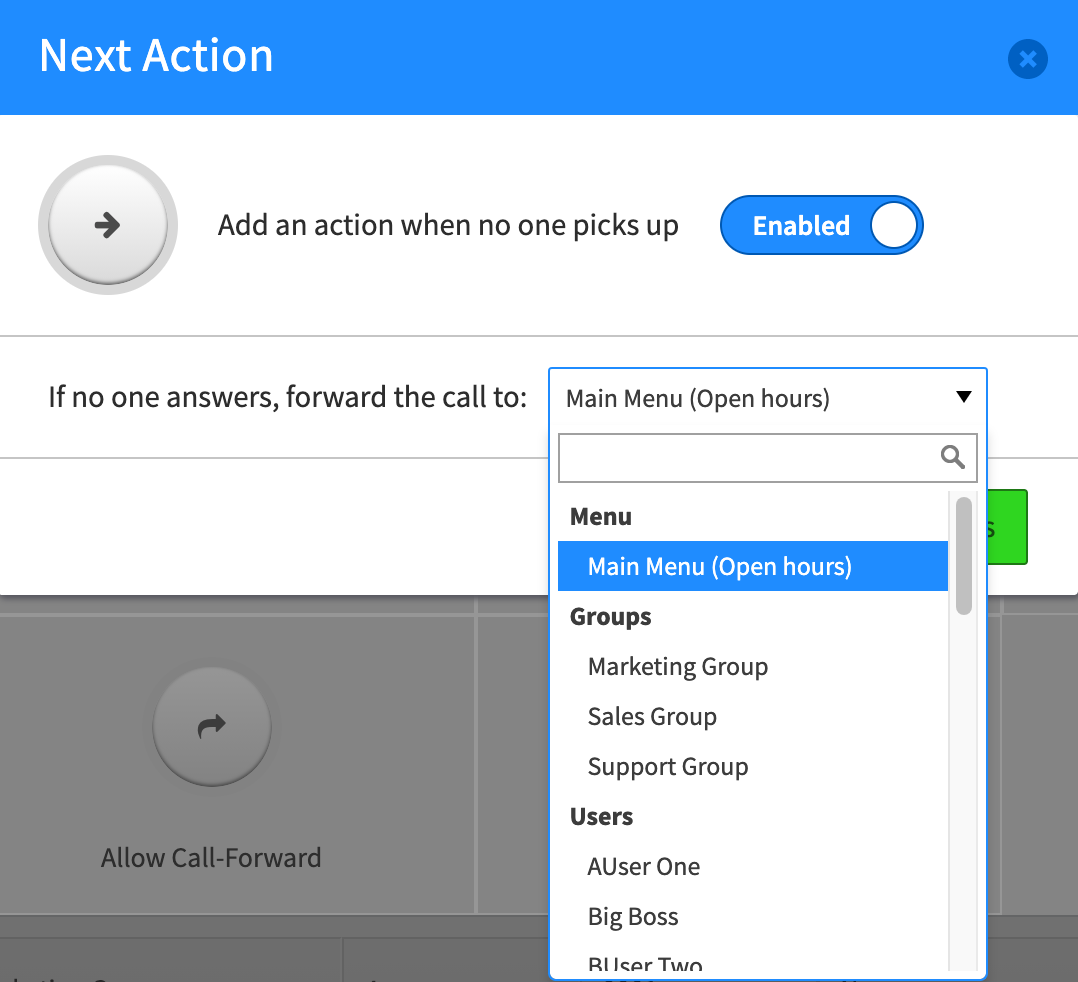
Next Action This allows you to set an alternate route for the caller if no-one picks up in the ring group.
-
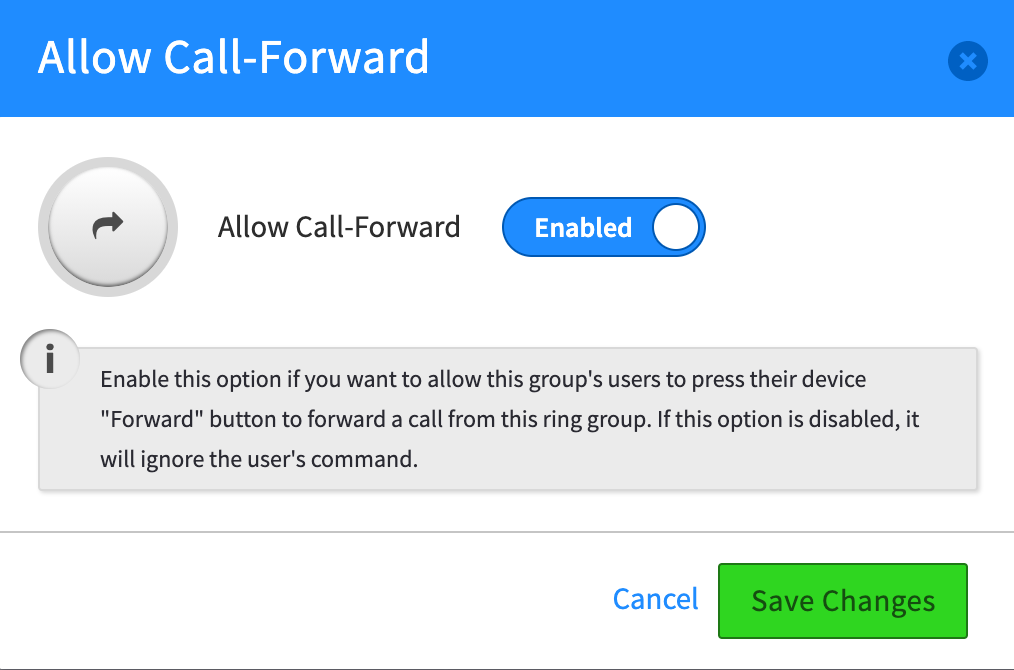
Allow Call-Forward When enabled this will allow the group’s users to press their device “Forward” button to forward a call from this ring group. If this is disabled, the command will be ignored.
-
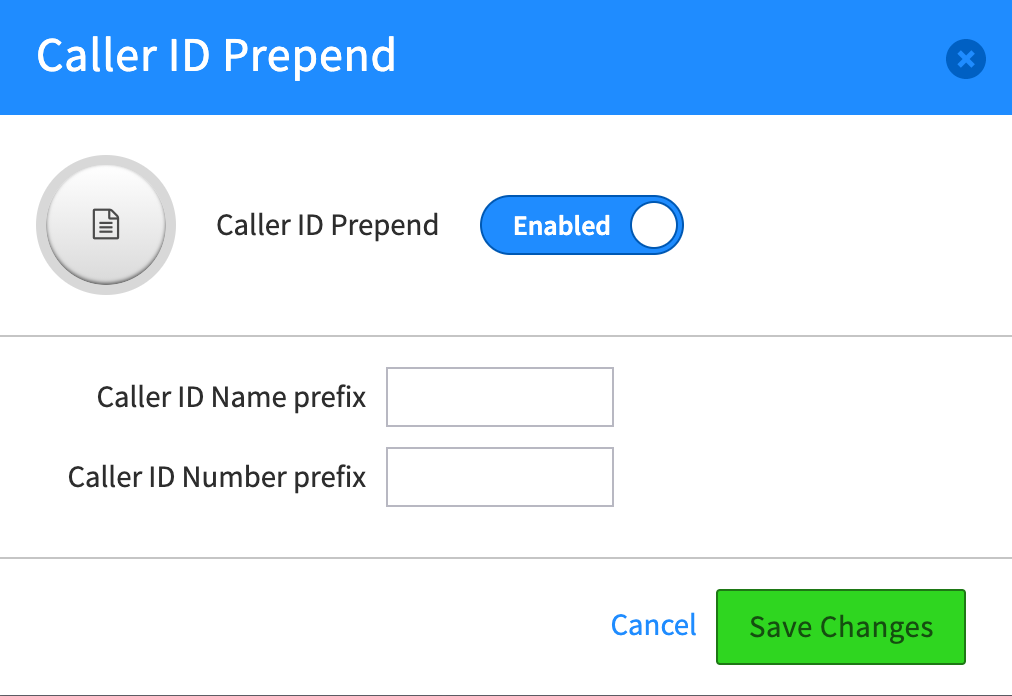
Caller ID Prepend This feature enables custom “prepending” Caller ID notices for incoming calls. An example could be if a caller was from a foreign-speaking country, that country code could be set (all +34 numbers could be tagged as ESP for Spain, etc.)
Main Number and Office Hours Management
Set up your own office Main Number within SmartPBX. Once you’ve added a number, set up an office hours strategy, set office holidays, manage incoming call handling, and even set a Main Conference Number.
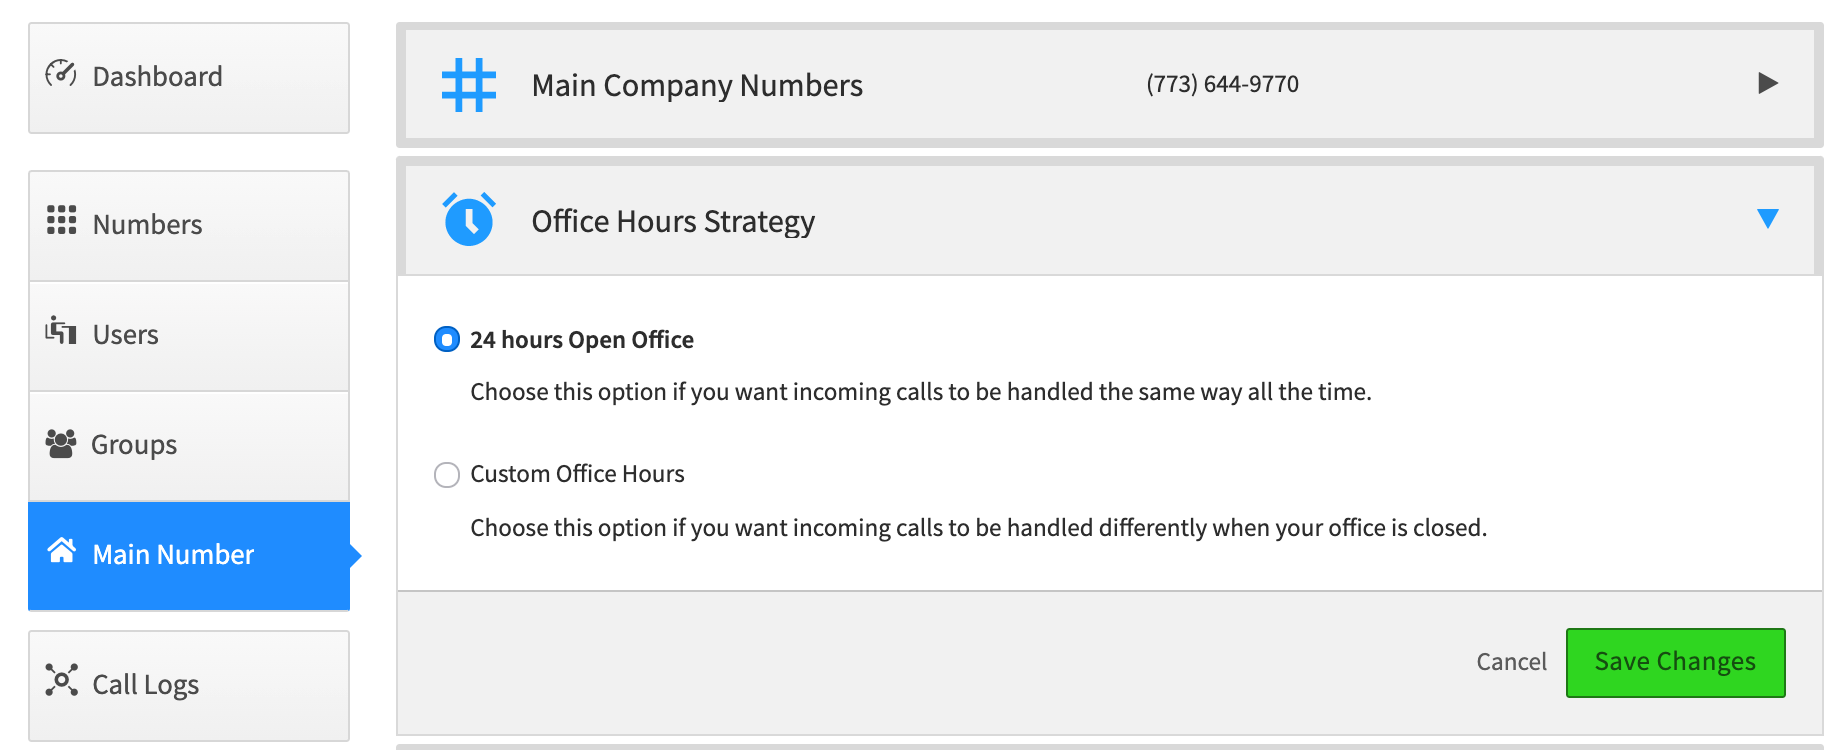
Create a Main Number
-
Go to the dashboard in SmartPBX and click “Main Number.”
-
Click “Main Company Numbers” and add a spare number or buy numbers.

Create Office Hours Strategy You have the option to set a 24 hours Open Office or Custom Office Hours. If you want to customize, set the times during the week that your office will be open. Save changes.
If you select Custom Hours, you will see the screen below.
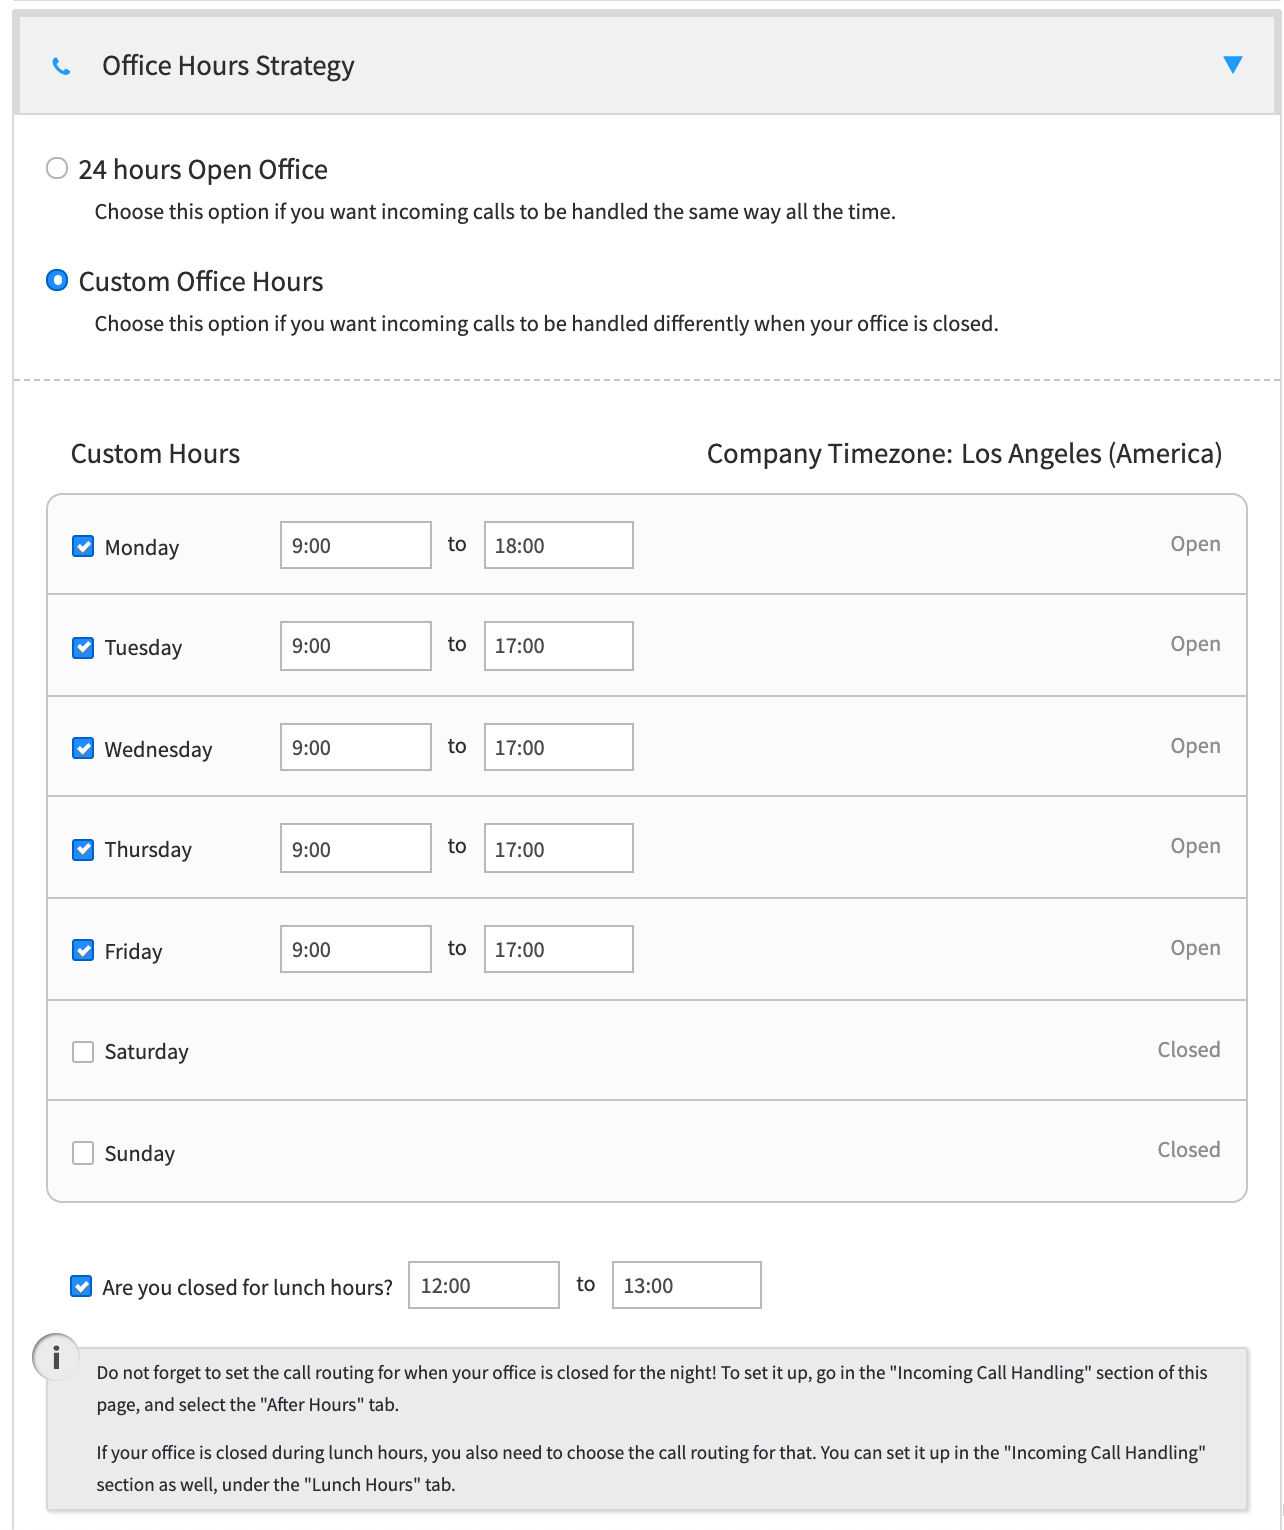
You have four options for inputting your hours:
- Add Hours Manually
- Select a Template
- Import a .csv file
NOTE: Please click HERE for a detailed overview of this process.
Set Office Holidays
The office holidays section allows you to enter your company holiday schedule. If you have holidays entered, you will be able to assign specific Incoming Call Handling paths that are specific for holidays.
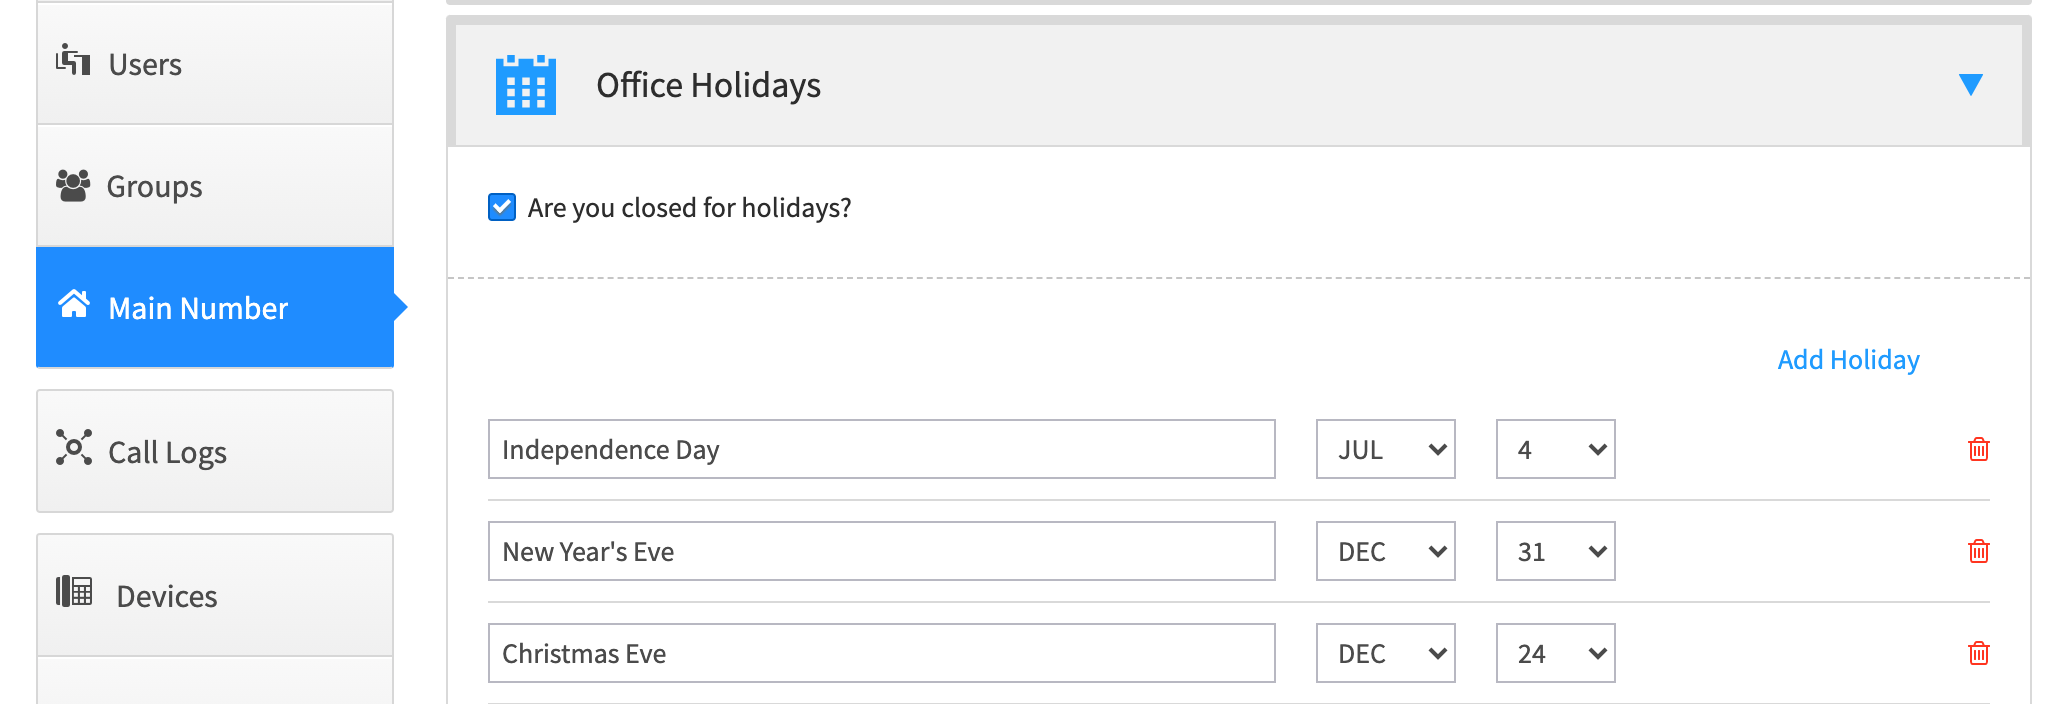
- Click if you are closed on holidays and click the button “Add Holiday.”
- Add a specific holiday date, select a date range or select an advanced function. Add dates and save changes.
Incoming Call Handling
This is where you will set where incoming calls will be directed, and apply customized greetings to different extensions.
NOTE: We have also created a video describing the steps below for helping you with these settings. You can find it. HERE
Click “Incoming Call Handling” and select how you would like to be reached during “Open Hours” and “After Hours.”
NOTE: Below is an overview of a simple call handling setup. If you want to include additional conditions and routing options, such as added extensions and conditions for different languages or using different answering services based on incoming country codes, refer to our more advanced call handling document, “How to set up a Virtual Receptionist”, here.
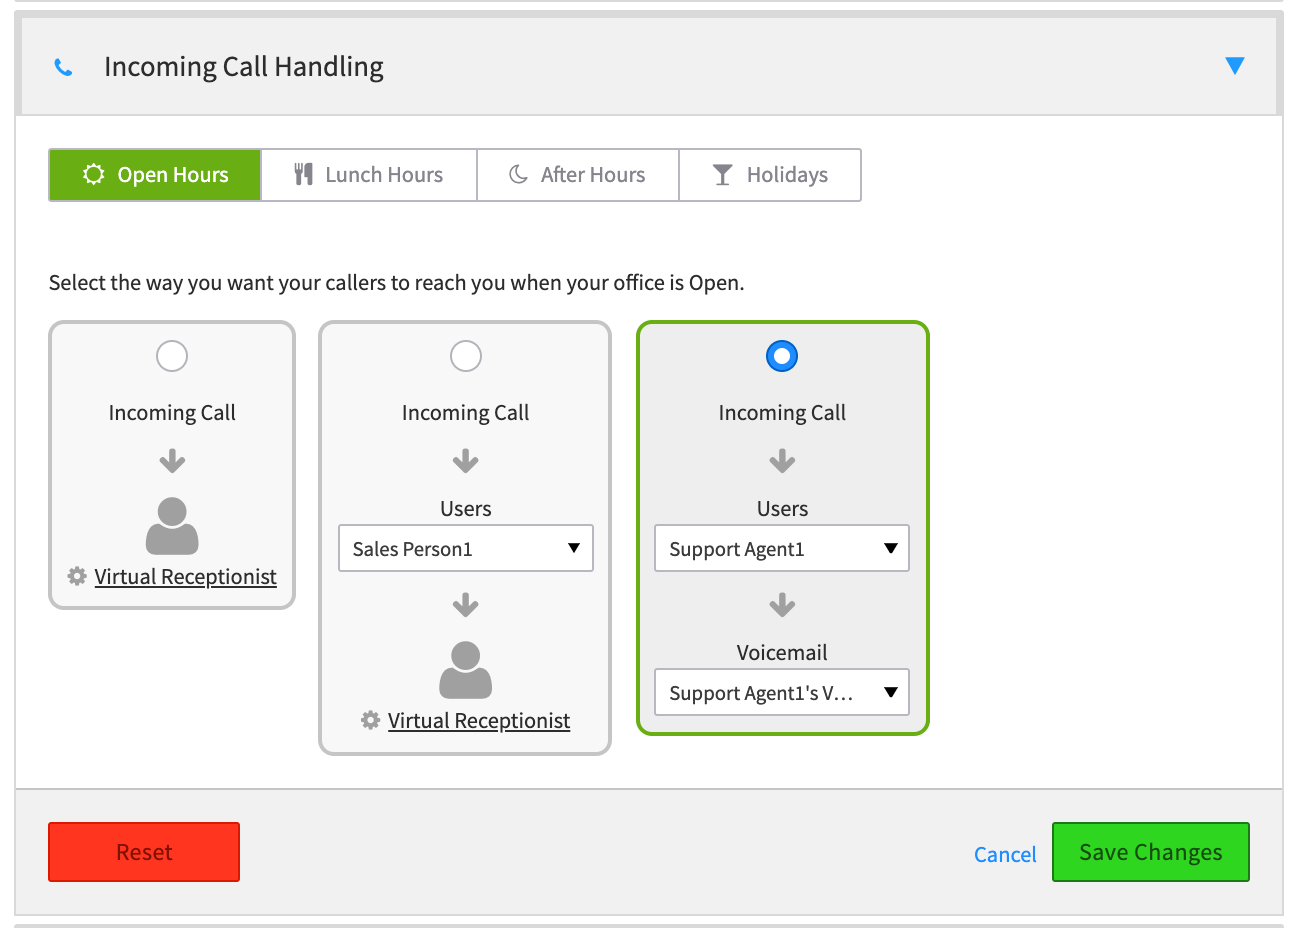
Select whether you would like incoming calls to go straight to a Virtual Receptionist, a User and then a Virtual Receptionist, or a User and then a Voicemail Box.
- If using a Virtual Receptionist, add call routes to contact the appropriate department or person.
- If using a Voicemail, select what voicemail you would like to use.
- Note that extension 0 is automatically assigned to the main number voicemail.
- Step through these settings for each of the office hours windows if you want a different call pattern for each.

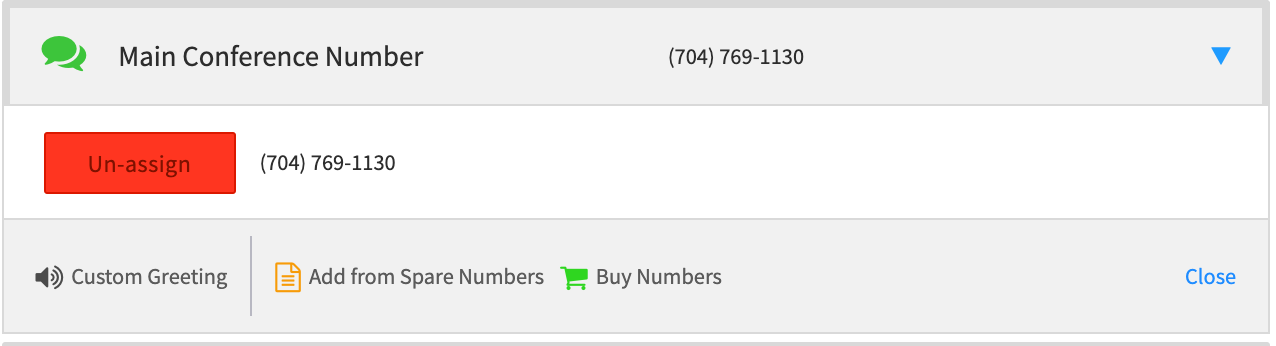
Select Main Conference Number.
This must be assigned to use any of the conference features. Assign a dedicated number from your Spare numbers or purchase a new number.
Set a custom greeting. If you want a custom greeting as a welcome to your conferences, add it here.
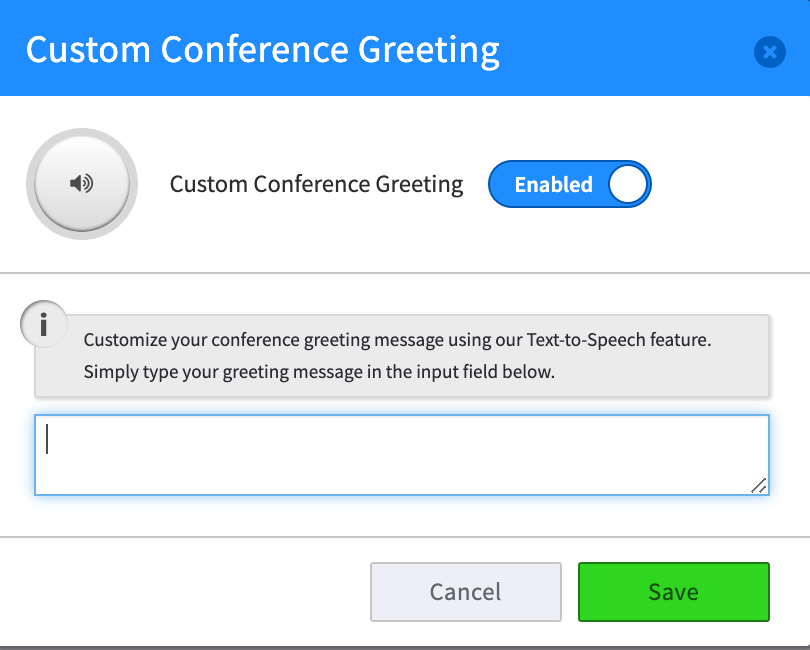
- Enable the greeting
- Type in a greeting and Text To Speech will convert it.
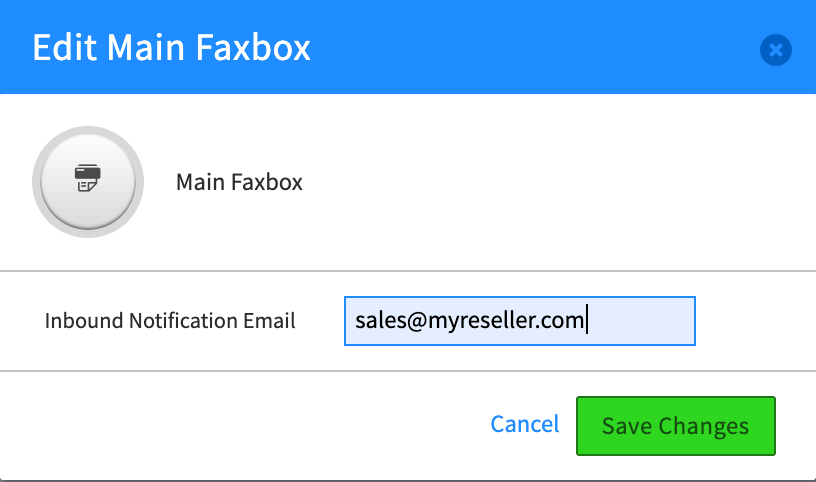
Set your main Faxbox number
This should be dedicated number for your Office’s Main Fax.
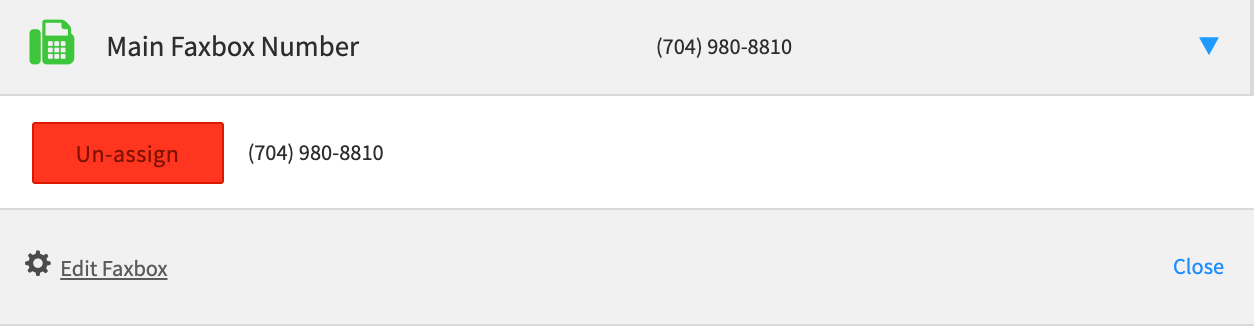
NOTE: If you select the Edit Faxbox setting, you can enter an email address for sending a notification when the main faxbox receives incoming documents. This is different than a “personal faxbox” which is defined and directed under each user feature.
Provision Devices
With provisioning in SmartPBX, you can handle many devices from multiple manufactures. The UI comes pre-populated with supported manufacturers and devices. If you had purchased a device through a certified manufacturer, you can provision a supported device by entering the Mac address and creating a name. If you did not, you will have to perform a few additional steps. If you do not have a supported device, you will have to manually provision your device.
To Autoprovision a device:
Click on the “Add Device” button within the “Devices” section of SmartPBX
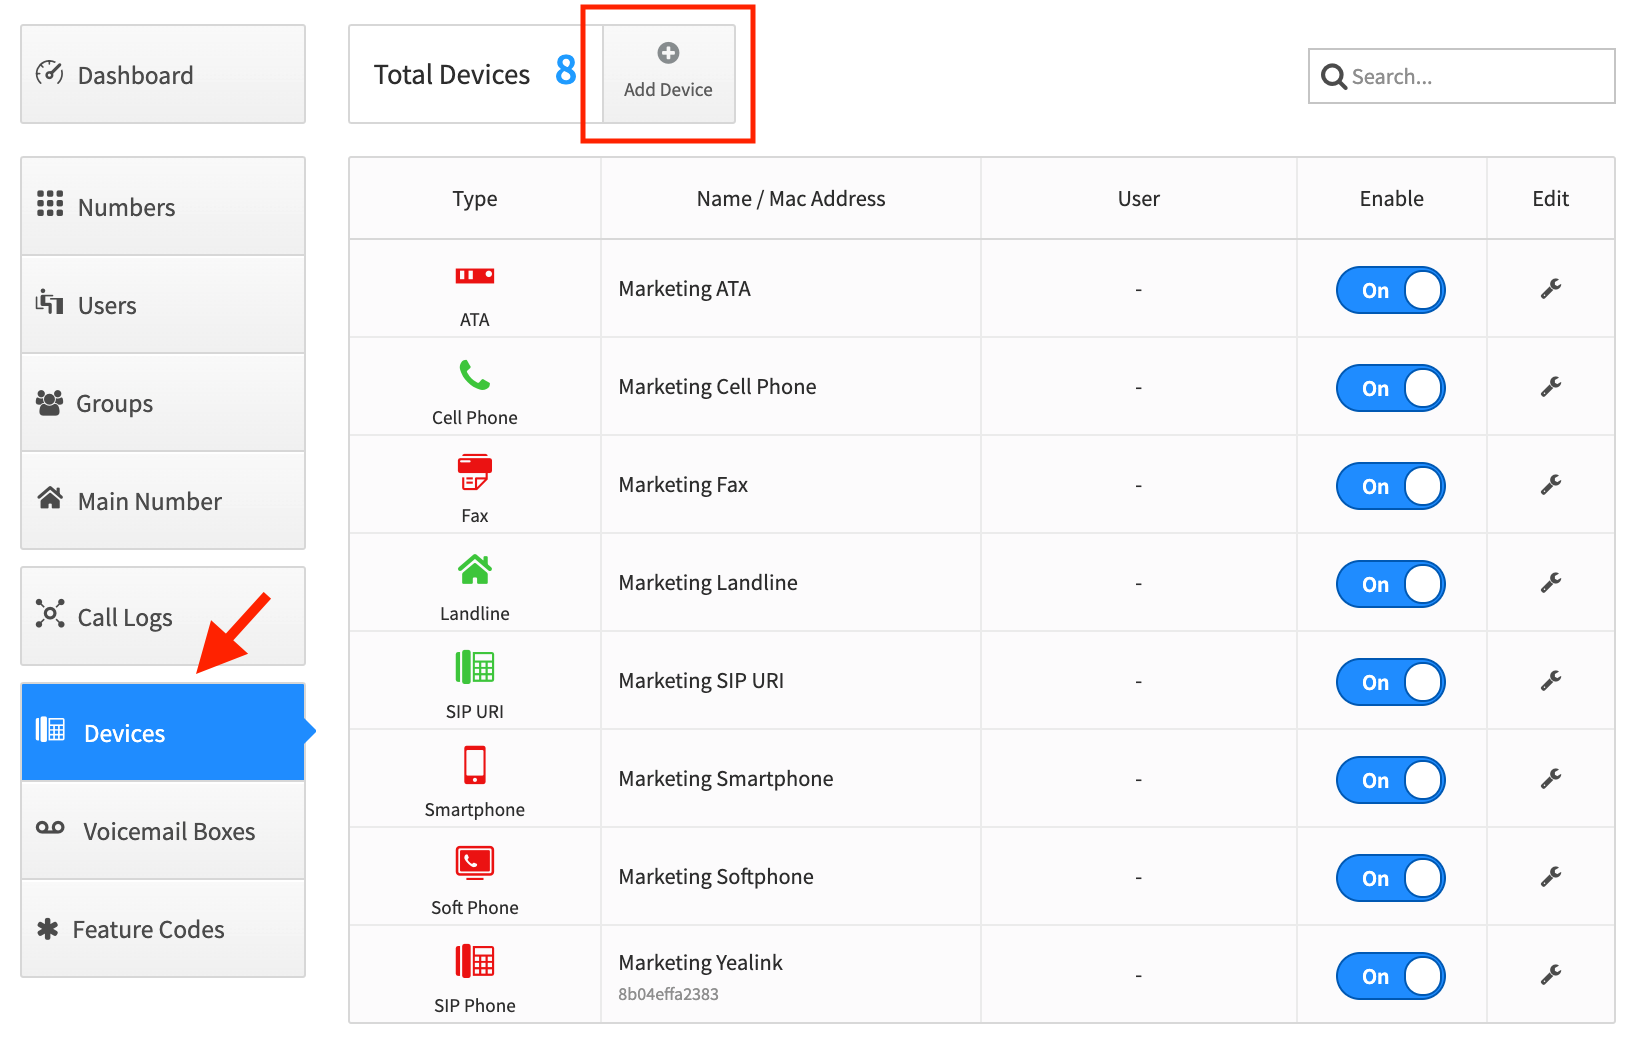
Select what type of device you would like to add. In this example, we will add a SIP phone.
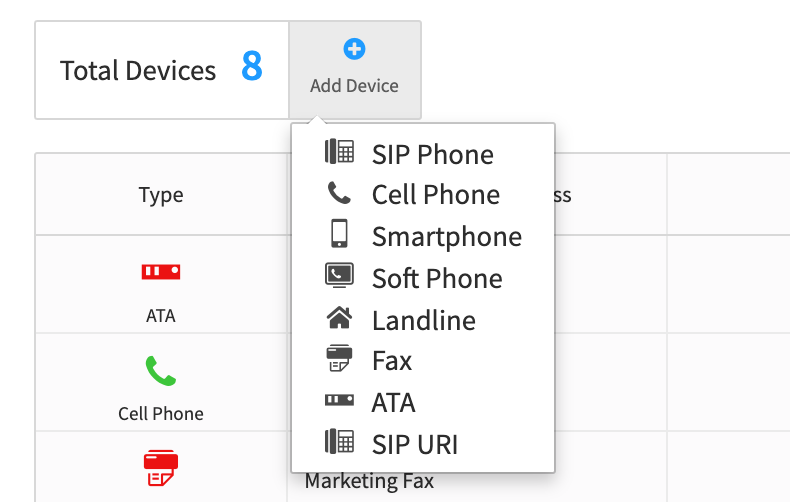
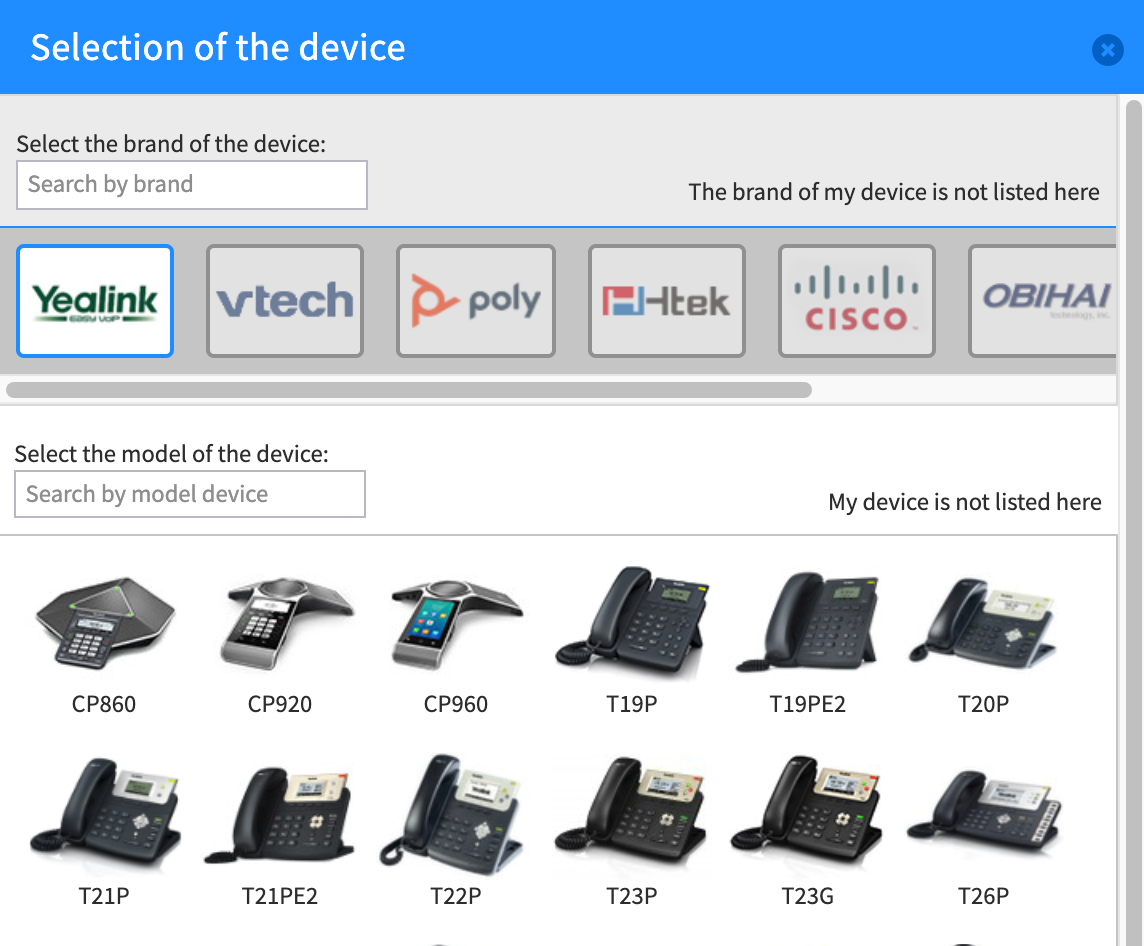
Select the manufacturer for the device (you may need to scroll or search to find yours)

Select the model, which will be displayed along with a picture for easy identification. If you do not see your manufacturer or model, you will need to manually provision your device.
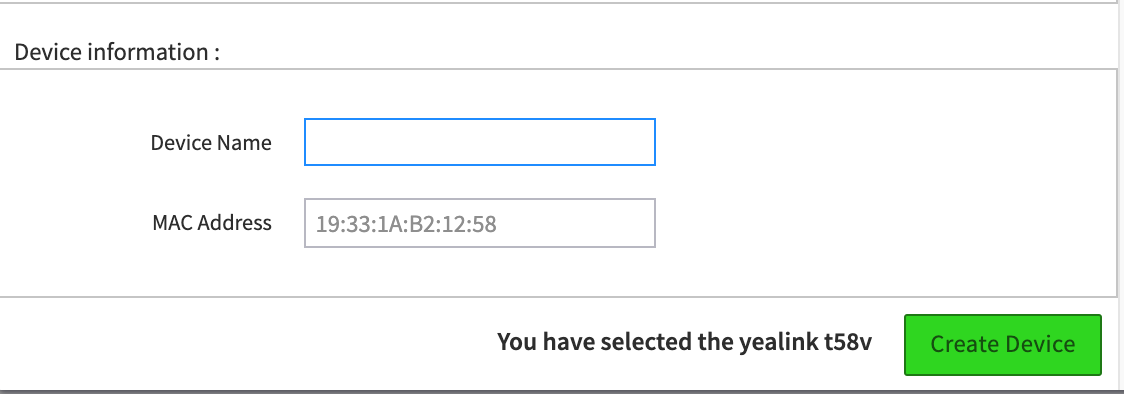
At the bottom of the device model selection window, enter a device name and the MAC address. The MAC address is typically found on the back of your SIP device.
Auto-Provision Devices varies among manufacturers, so you need to go into the manufacturer’s website to auto-provision each device. To do this, turn on your SIP device and enter the IP Address into your web browser.
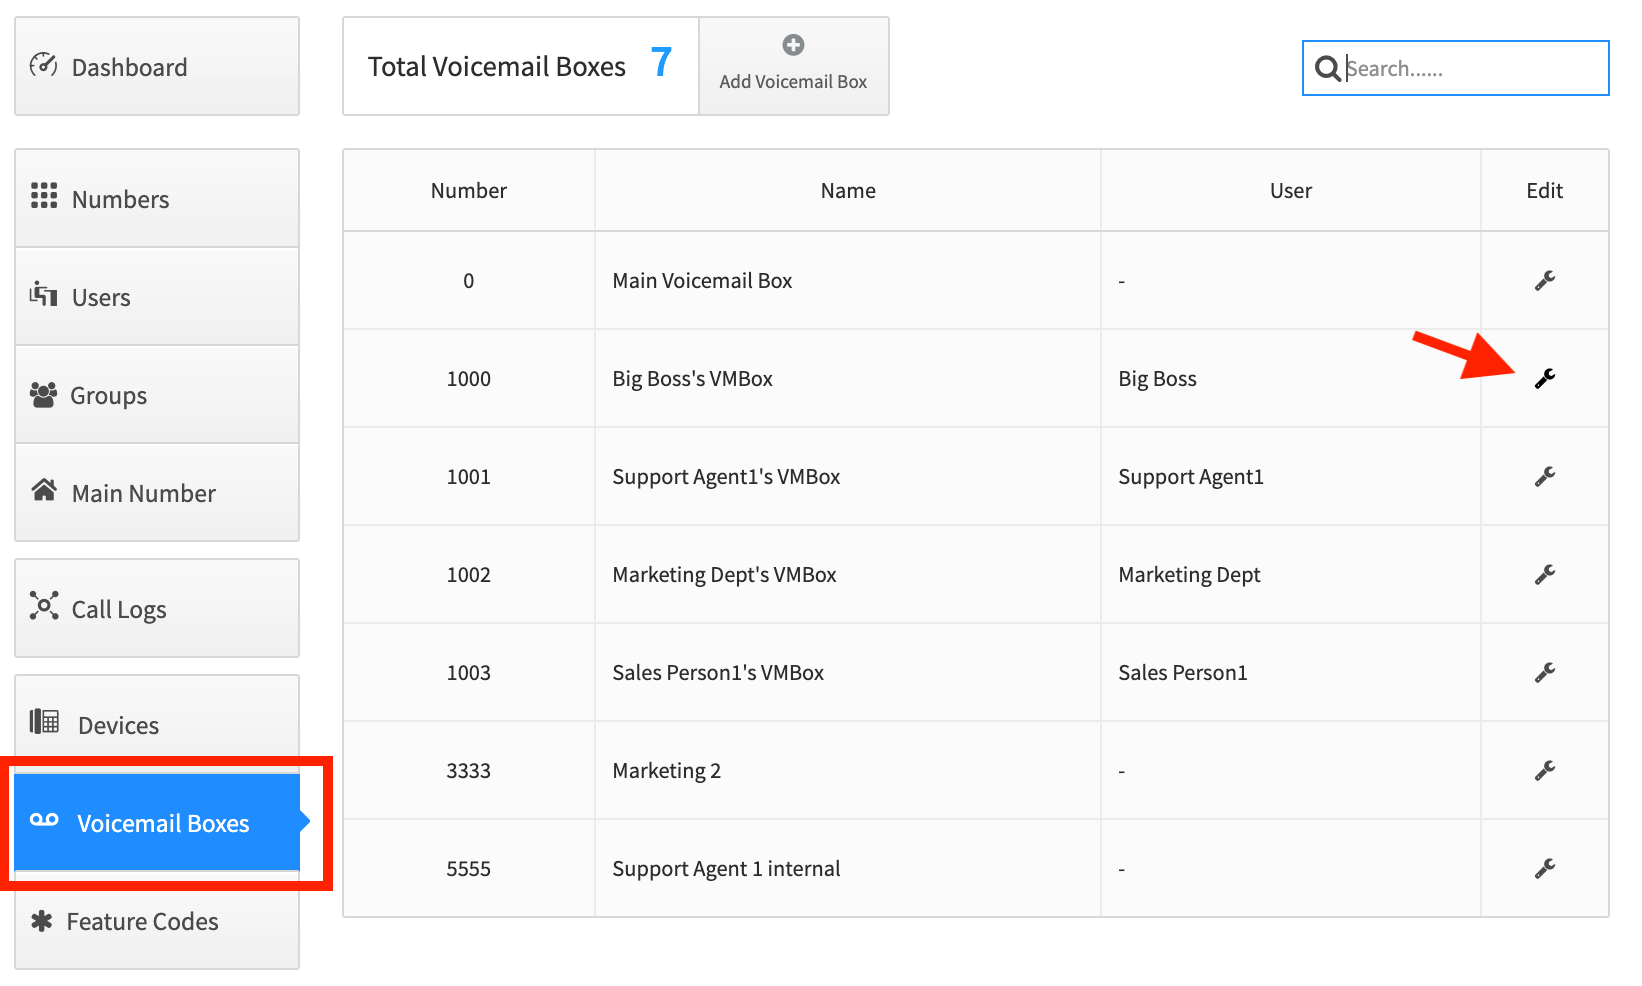
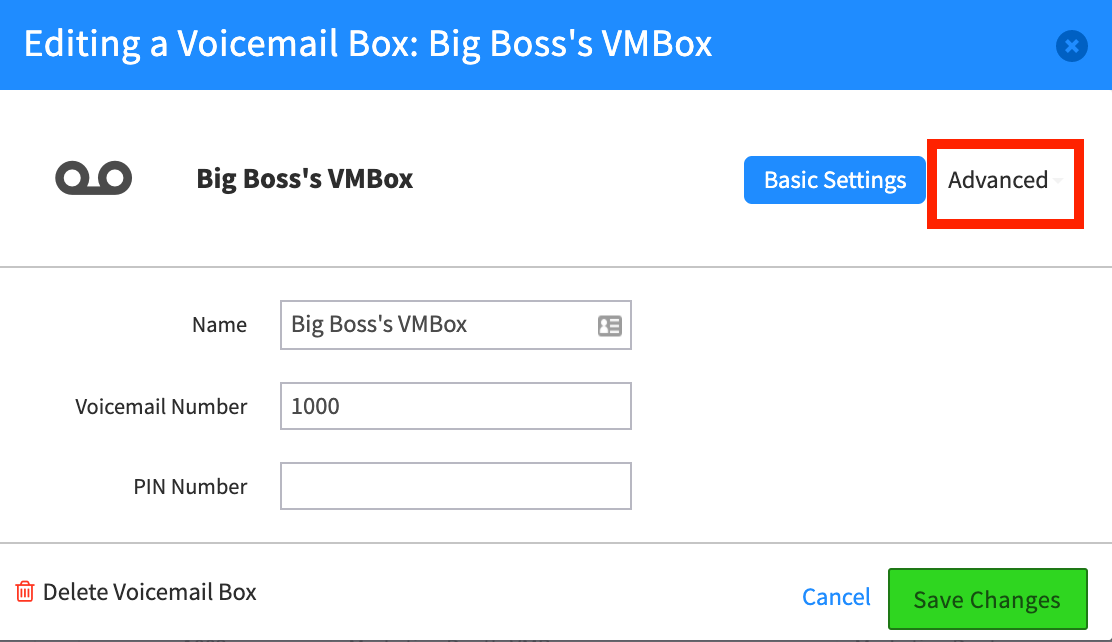
Voicemail Boxes
Voicemail Boxes can be created and managed within the SmartPBX UI. Voicemail Boxes will be populated in the “Voicemail Boxes” tab once a new user is created. From there you have advanced options such as providing pins, greetings, and adding recipients.
NOTE: We have also created a video describing how to access your voicemail box. You can find it here
To access Voicemail Boxes
- Click on the “Voicemail Boxes” tab of SmartPBX, just left of the dashboard.
- Within the “Voicemail Boxes” dashboard, click on the “Add Voicemail Box” button.
- Fill out all the pertinent information in Basic Settings.
- Manage PIN, Auto-Login, Greetings, Instructions, Delete after Notification, Configurable via Menu via Advanced Settings and Add Recipients.
Announce-only Voicemail Box
Perfect for closures and other informational messages, announce-only voicemail box enables a voicemail box to play a recorded message without allowing callers to leave a voicemail. This feature can be enabled and messages can be easily changed at any time from the Voicemail Box menu option.
-
Select Voicemail Boxes.
-
Find your name and number.
-
Select the settings icon to the right.
-
Select the Advanced Tab
- Select Announce-only mode
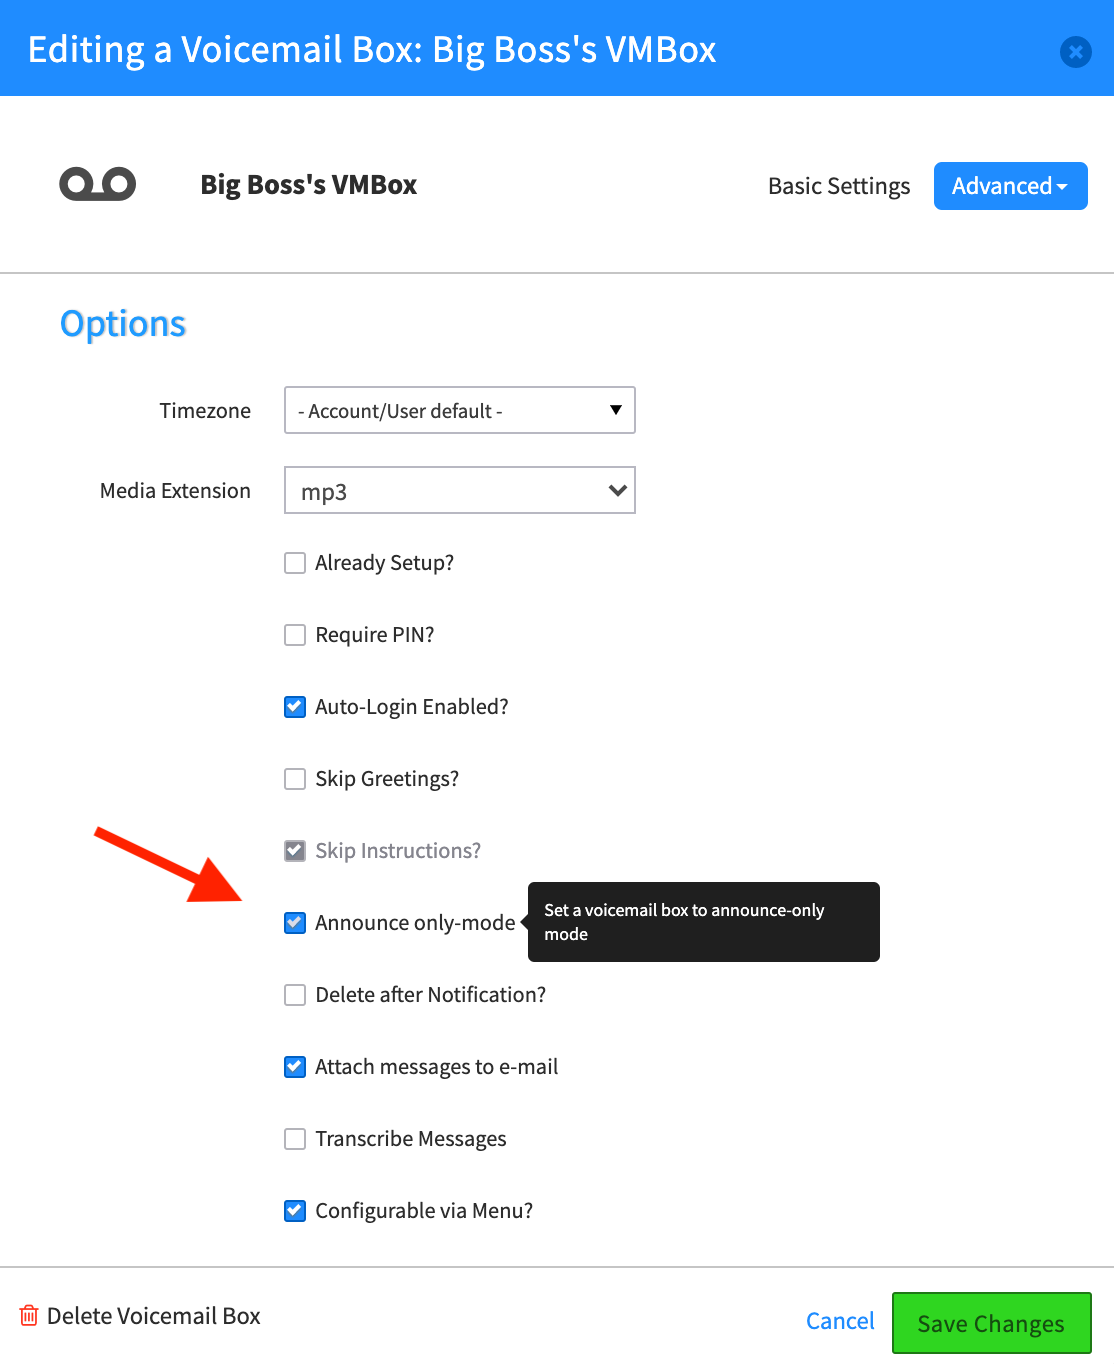
SAVE !!!
Enabling Voicemail transcription
NEW! We have added a “Transcribe Voicemail” option. The transcriptions will be sent to the email associated with your user name. There are two ways to update this setting and turn it on (note there is an added charge of $0.05/minute for this feature as it requires significant storage and a transcription service)
NOTE: We have also created a video describing the steps below! Find it HERE.
Option 1 From your user settings, under User / User Features / Voicemail box / Transcribe
![]()
![]()
Option 2
From your voicemail boxes menu, select Advanced and check “Transcribe Messages”.
![]()
Feature Codes
Feature Codes allows you to map common system-wide features to use keys you’re already familiar with. Feature codes include call parking, intercom, voicemail and more. These feature codes can be utilized by your device.

NOTE: In some cases, depending on your devices these feature codes may accept edits. This can be accessed by an administrator using the Callflows app.
Easy Call Logs
Diagnose call delivery problems with ease. Every call is tracked and every device that rings or that is attempted is shown. Call problems can also be reported with a single click.
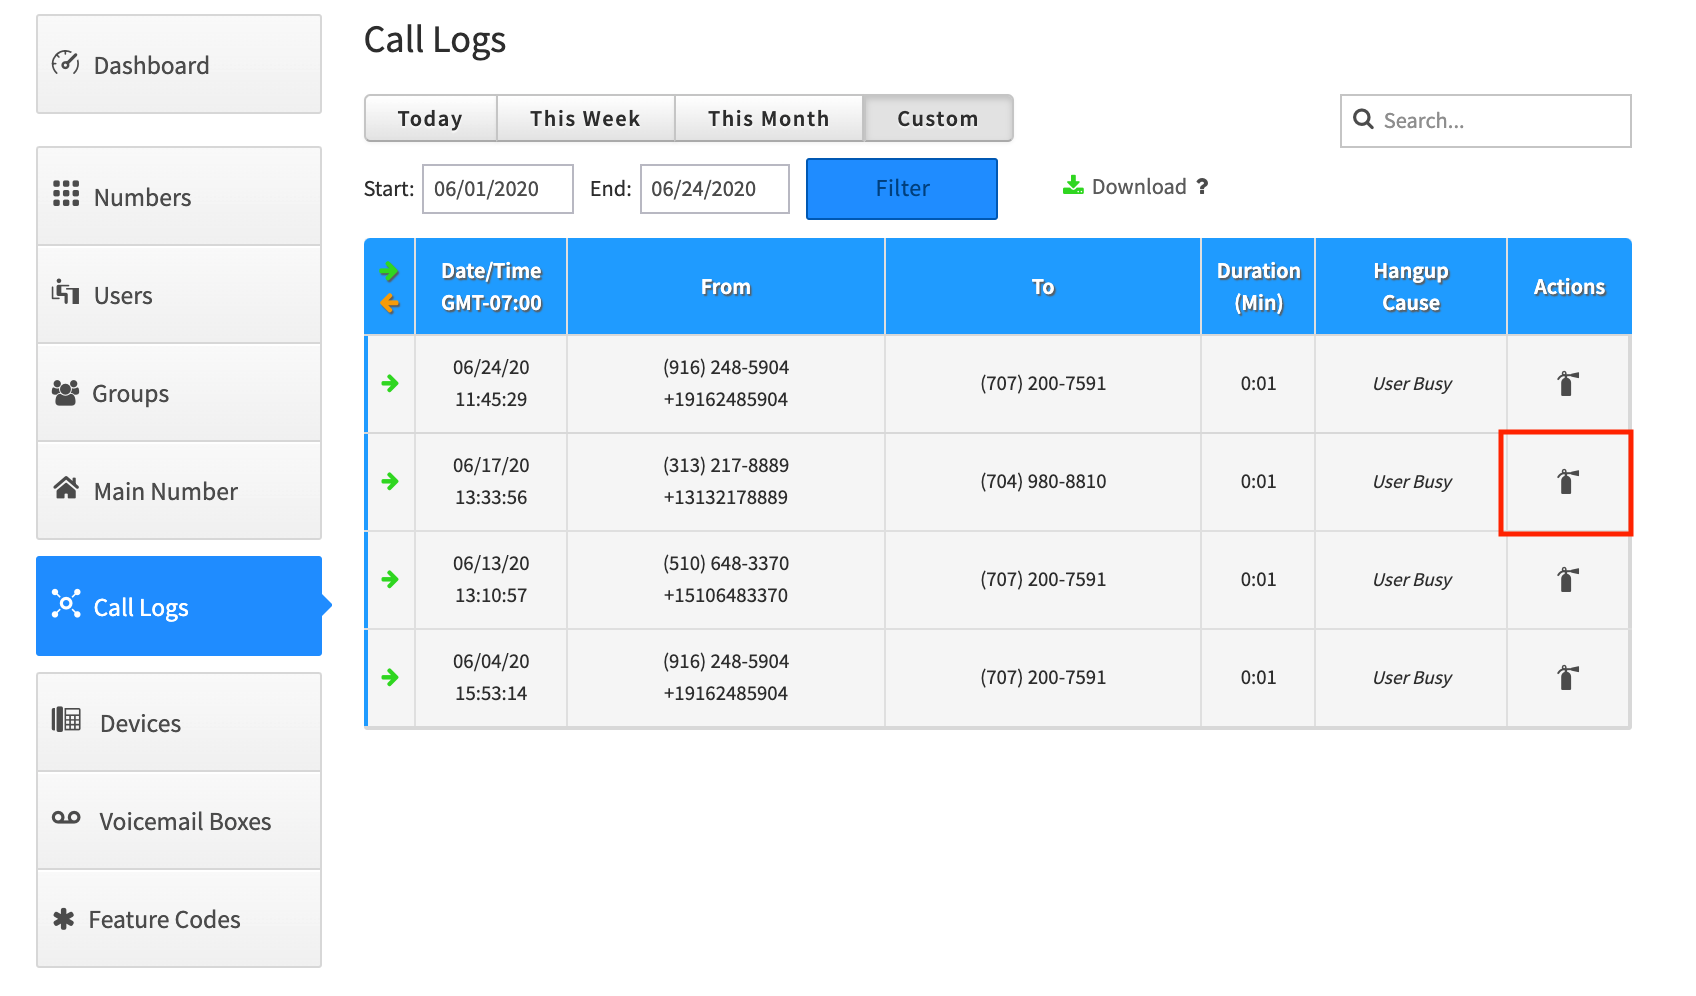
If you need help understanding an issue with a call, you can select the icon under the Actions column. A log will be inserted into a text editor for you to add any details of the call you think is relevant (e.g. bad static, unexpected hang up, no audio, etc.)This will give you data about the call you can send to our support team to help diagnose it.
The call log might look like this:
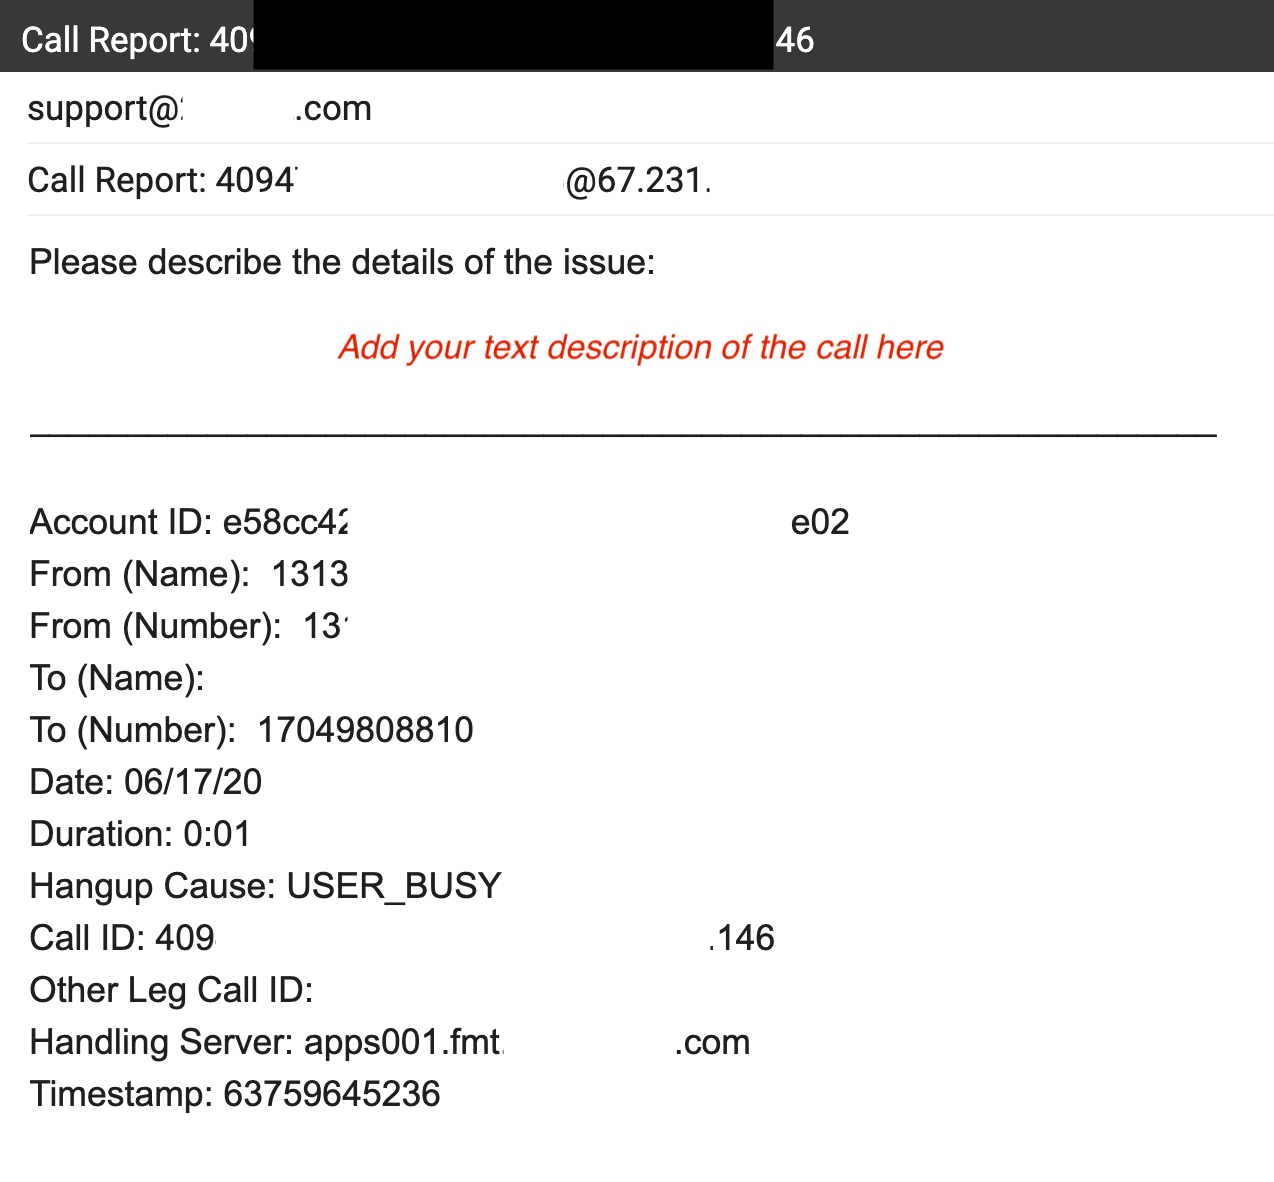
We recommend you save your edits, and then email that file to your support team.